on
Getting started with Core Data
Table of Content
- Overview
- Data Model
- Core Data Stack
- Operations (CRUD)
- Core Data Concurrency
- Is Core Data Thread Safe?
- .mainQueueConcurrencyType
- .privateQueueConcurrencyType
- NSManagedObjectContext.perform
- NSManagedObjectContext.performAndWait
- Core Data Background Context
- Core Data Background Fetch Request
- Save Core Data On A Background Thread
- Create A New Core Data Object On A Background Thread
- Parent/Child Managed Object Context
- Fetch Requests
- Queries Using NSPredicate
- Migrations
- Core Data vs Realm
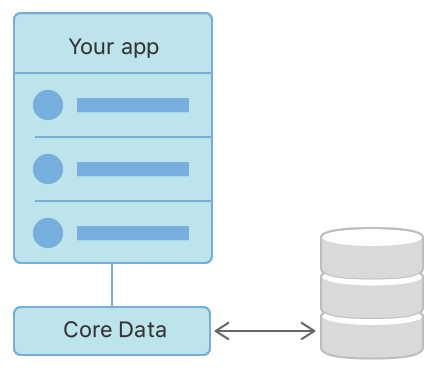
Overview
Core Data is an object graph and persistence framework that you use to manage the model layer objects in your application. Core Data provides on-disk persistence, which means your data will be accessible even after terminating your app or shutting down your device. This is different from in-memory persistence, which will only save your data as long as your app is in memory, either in the foreground or in the background.
Use Core Data to save your application’s permanent data for offline use, to cache temporary data, and to add undo functionality to your app on a single device. To sync data across multiple devices in a single iCloud account, Core Data automatically mirrors your schema to a CloudKit container.
Through Core Data’s Data Model editor, you define your data’s types and relationships, and generate respective class definitions. Core Data can then manage object instances at runtime to provide the following features.
What is object graph? In an object-oriented program, groups of objects form a network through their relationships with each other — either through a direct reference to another object or through a chain of intermediate references. These groups of objects are referred to as object graphs. Object graphs may be small or large, simple or complex.
Core Data vs SQLite
-
Basically, Core Data is a framework used to save, track, modify and filter the data within iOS apps, however, Core Data is not a Database.
-
SQLite is a database itself like we have MS SQL Server.
-
Core Data is using SQLite as its persistent store but the framework itself is not the database.
-
But Core Data is an ORM (Object Relational Model) which creates a layer between the database and the UI.
-
It speeds-up the process of interaction as we don’t have to write queries, just work with the ORM and let ORM handles the backend.
Undo and Redo of Individual or Batched Changes
Core Data’s undo manager tracks changes and can roll them back individually, in groups, or all at once, making it easy to add undo and redo support to your app.

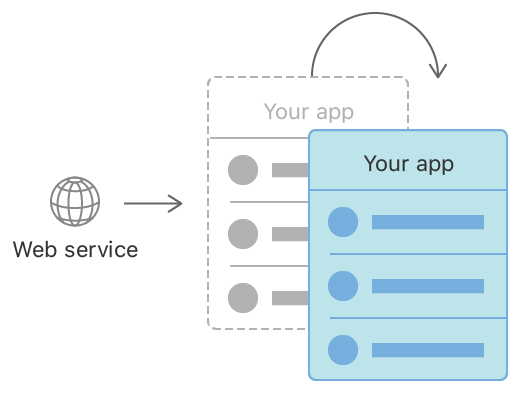
Background Data Tasks
Perform potentially UI-blocking data tasks, like parsing JSON into objects, in the background. You can then cache or store the results to reduce server roundtrips.
View Synchronization
Core Data also helps keep your views and data synchronized by providing data sources for table and collection views.
Versioning and Migration
Core Data includes mechanisms for versioning your data model and migrating user data as your app evolves.
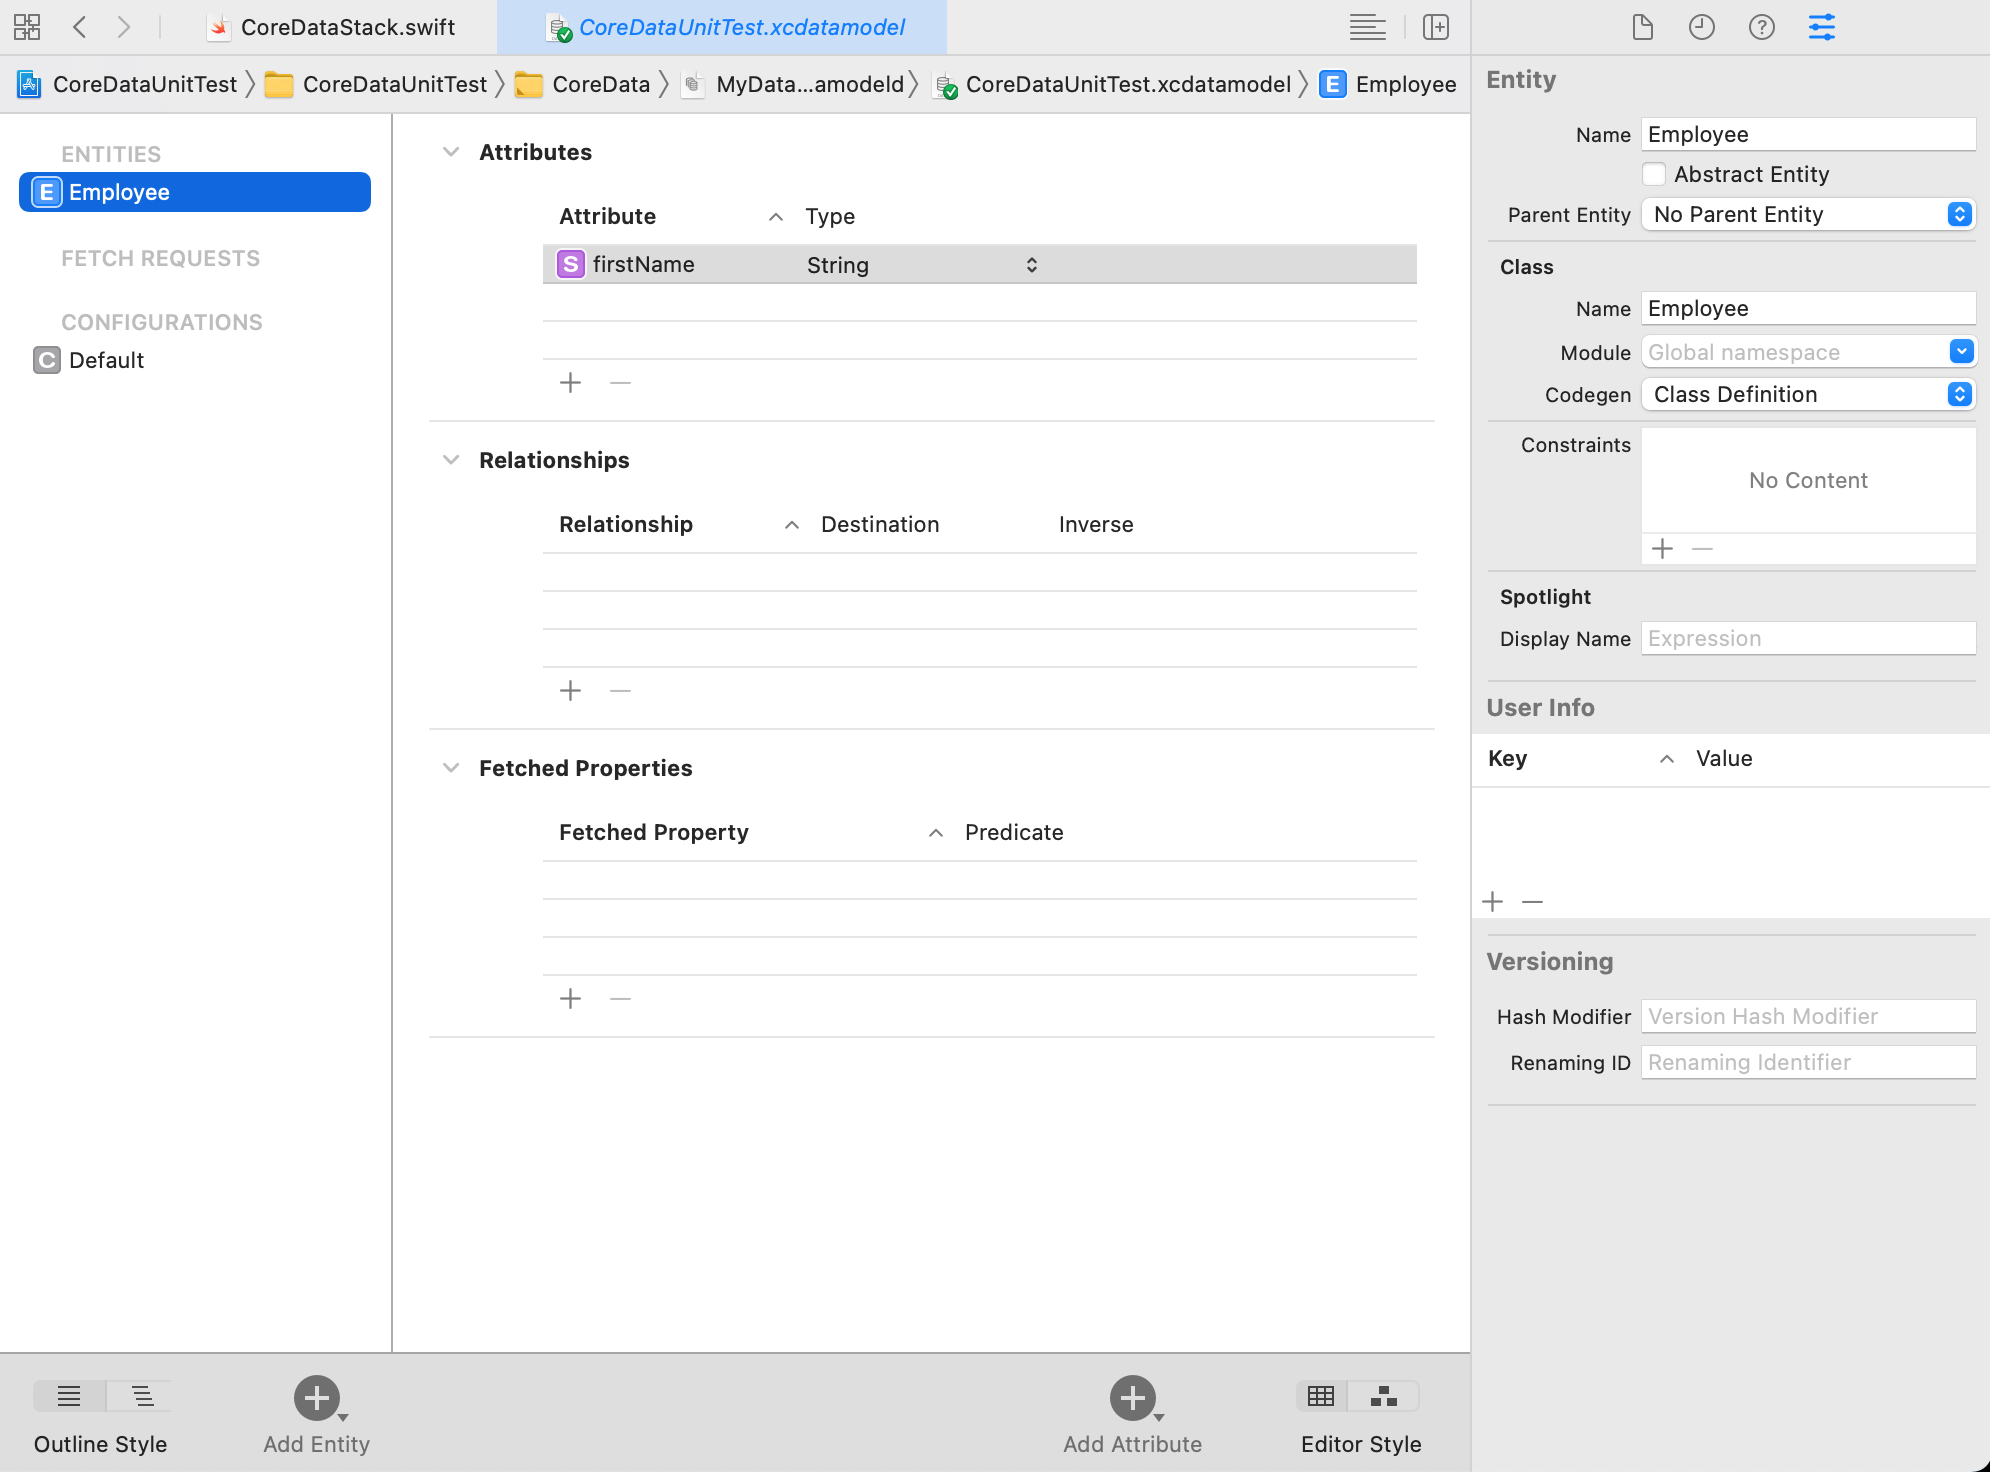
Data Model
To start working with Core Data we need to create a Data Model – a file containing definition of our entities. In order to do that, just press CMD+N and select Data Model template.
-
Xcode comes with a powerful Data Model editor, which you can use to create your managed object model.
-
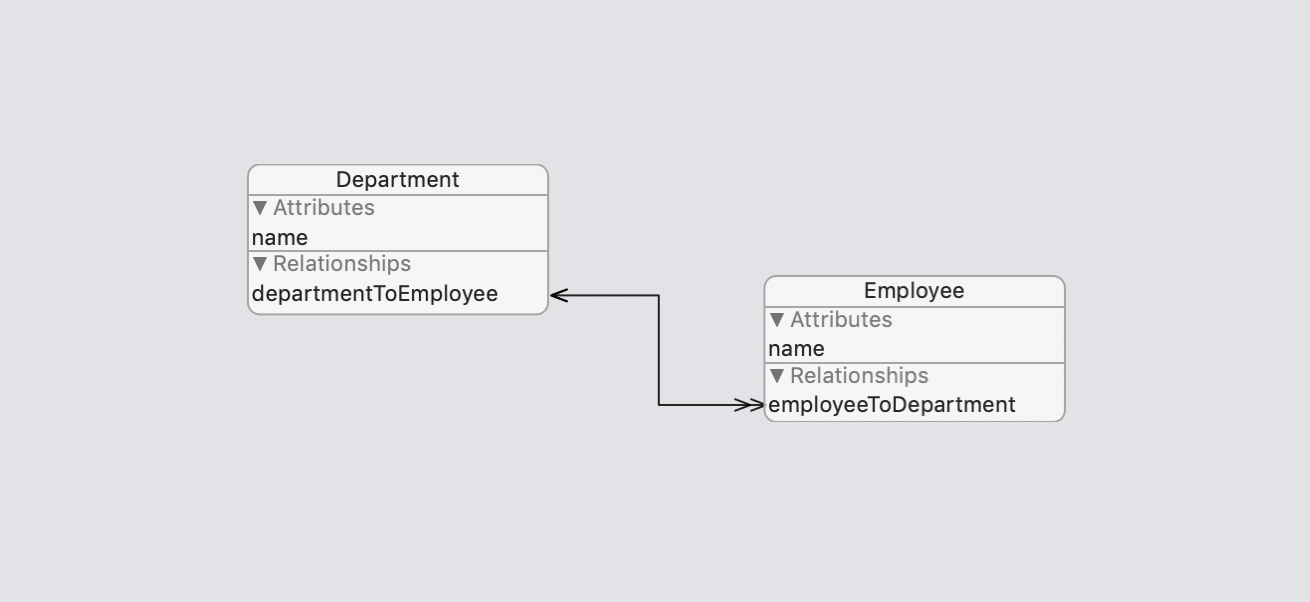
A managed object model is made up of entities, attributes and relationships
-
An entity is a class definition in Core Data.
-
An attribute is a piece of information attached to an entity.
-
A relationship is a link between multiple entities.
Core Data Stack

-
An instance of NSManagedObjectModel represents your app’s model file describing your app’s types, properties, and relationships.
-
An instance of NSManagedObjectContext An object space to manipulate and track changes to managed objects.
-
An instance of NSPersistentStoreCoordinator saves and fetches instances of your app’s types from stores. A coordinator that uses the model to help contexts and persistent stores communicate.
-
An instance of NSPersistentContainer sets up the model, context, and store coordinator all at once.
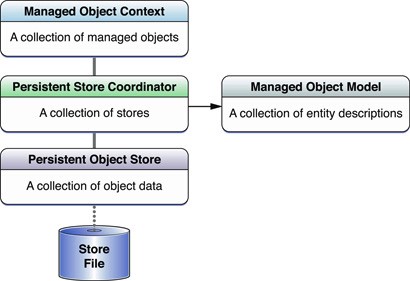
Persistent store
A persistent store is the interface between the coordinator and the permanent state of the object graph for both reading and writing. When a change is pushed onto the store, the change becomes a permanent part of the object state, meaning the position of the storage in memory or on disk is not relevant.
You can think of a persistent store as a database file (Sqlite) where individual records each hold the last-saved values of a managed object (Entity).
-
NSInMemoryStoreType: Stores the entire object graph in memory. Persistent, although not in the case that you turn off the machine or shut down the App.
-
NSBinaryStoreType: Of the atomic storetypes this occupies the least disk space, and loads the fastest. Not compressed. As an atomic store type every Code Data object is loaded at once.
-
NSSQLiteStoreType: Non-atomic. Occupies binary-like disk space (small), loads quickly but the file needs to be available with exclusive access. Supports atomic updates. Core Data uses this type by default, and many Apps seem to use this as their go-to backing store. Non-atomic, so has a smaller memory footprint than the atomic types.
-
NSXMLStoreType: Not supported in iOS, but XML is human readable rather than going for outright speed. An atomic type, so can have a large memory footprint.
import CoreData

/*
 This is the CoreDataStack used by the app. It saves changes to disk.

 Managers can do operations via the:
 - `mainContext` with interacts on the main UI thread, or
 - `backgroundContext` with has a separate queue for background processing

 */
class CoreDataStack {

    static let shared = CoreDataStack()

    let persistentContainer: NSPersistentContainer
    let backgroundContext: NSManagedObjectContext
    let mainContext: NSManagedObjectContext

    private init() {
        let container = NSPersistentContainer(name: "CoreDataUnitTest")

        let description = container.persistentStoreDescriptions.first
        description?.type = NSSQLiteStoreType
        description?.shouldMigrateStoreAutomatically = true
        description?.shouldInferMappingModelAutomatically = true

        container.loadPersistentStores { description, error in
            guard error == nil else {
                fatalError("was unable to load store \(error!)")
            }
        }

        mainContext = container.viewContext
        mainContext.automaticallyMergesChangesFromParent = true

        backgroundContext = container.newBackgroundContext()
        backgroundContext.mergePolicy = NSMergeByPropertyObjectTrumpMergePolicy

        persistentContainer = container
    }
}
Operations (CRUD)
Create (Insert)
@discardableResult
func createEmployee(firstName: String) -> Employee? {
    let context = persistentContainer.viewContext

    let employee = Employee(context: context)

    employee.firstName = firstName

    do {
        try context.save()
        return employee
    } catch let error {
        print("Failed to create: \(error)")
    }

    return nil
}
Read (Fetch)
By default Xcode inside each entity will generate fetchRequest class function which can be used to retrieve all objects. However you can also create your own NSFetchRequest with custom NSPredicate.
func fetchEmployees() -> [Employee]? {
    let context = persistentContainer.viewContext

    let fetchRequest = NSFetchRequest<Employee>(entityName: "Employee")
    fetchRequest.sortDescriptors = [NSSortDescriptor(key: "firstName", ascending: true)]

    do {
        let employees = try context.fetch(fetchRequest)
        return employees
    } catch let error {
        print("Failed to fetch companies: \(error)")
    }

    return nil
}

func fetchEmployee(withName name: String) -> Employee? {
    let context = persistentContainer.viewContext

    let fetchRequest = NSFetchRequest<Employee>(entityName: "Employee")
    fetchRequest.fetchLimit = 1
    fetchRequest.predicate = NSPredicate(format: "firstName == %@", name)

    do {
        let employees = try context.fetch(fetchRequest)
        return employees.first
    } catch let error {
        print("Failed to fetch: \(error)")
    }

    return nil
}
Update
func updateEmployee(employee: Employee) {
    // Update entity properties as needed
    employee.firstName = "Linh"

    let context = persistentContainer.viewContext

    do {
        try context.save()
    } catch let error {
        print("Failed to update: \(error)")
    }
}
Delete
func deleteEmployee(employee: Employee) {
    let context = persistentContainer.viewContext
    context.delete(employee)

    do {
        try context.save()
    } catch let error {
        print("Failed to delete: \(error)")
    }
}
Batch Delete
Calling delete(_:) for each individual NSManagedObject may take time if there are many objects to delete. A faster approach to batch delete objects in Core Data is NSBatchDeleteRequest. Use batch processes to manage large data changes.
Some important considerations when using NSBatchDeleteRequest are:
-
NSBatchDeleteRequestdirectly modifies theNSPersistentStorewithout loading any data into memory. -
An
NSBatchDeleteRequestdoes not modify anNSManagedObjectContext. UsemergeChanges(fromRemoteContextSave:, into:)as shown in the example if needed to inform aNSManagedObjectContextof the batch delete.
// Specify a batch to delete with a fetch request
let fetchRequest: NSFetchRequest<NSFetchRequestResult>
fetchRequest = NSFetchRequest(entityName: "Business")

// Create a batch delete request for the
// fetch request
let deleteRequest = NSBatchDeleteRequest(
    fetchRequest: fetchRequest
)

// Specify the result of the NSBatchDeleteRequest
// should be the NSManagedObject IDs for the
// deleted objects
deleteRequest.resultType = .resultTypeObjectIDs

// Get a reference to a managed object context
let context = persistentContainer.viewContext

// Perform the batch delete
let batchDelete = try context.execute(deleteRequest)
    as? NSBatchDeleteResult

guard let deleteResult = batchDelete?.result
    as? [NSManagedObjectID]
    else { return }

let deletedObjects: [AnyHashable: Any] = [
    NSDeletedObjectsKey: deleteResult
]

// Merge the delete changes into the managed
// object context
NSManagedObjectContext.mergeChanges(
    fromRemoteContextSave: deletedObjects,
    into: [context]
)
Delete Everything (Delete All Objects, Reset Core Data)
One approach to delete everything and reset Core Data is to destroy the persistent store. Deleting and re-creating the persistent store will delete all objects in Core Data.
An important consideration when deleting everything in Core Data, make sure to release and re-initialize existing NSManagedObjectContext references. Using a NSManagedObjectContext backed by a deleted persistent store may have unexpected behavior.
// Get a reference to a NSPersistentStoreCoordinator
let storeContainer =
    persistentContainer.persistentStoreCoordinator

// Delete each existing persistent store
for store in storeContainer.persistentStores {
    try storeContainer.destroyPersistentStore(
        at: store.url!,
        ofType: store.type,
        options: nil
    )
}

// Re-create the persistent container
persistentContainer = NSPersistentContainer(
    name: "CoreDataModelFile" // the name of
    // a .xcdatamodeld file
)

// Calling loadPersistentStores will re-create the
// persistent stores
persistentContainer.loadPersistentStores {
    (store, error) in
    // Handle errors
}
Delete Rule
A delete rule defines what happens when the record that owns the relationship is deleted.

Core Data supports 4 delete rules: Cascade, Deny, Nullify, No Action. By default, the delete rule of a relationship is set to nullify.
No Action
If the delete rule is set to No Action to the relationship then nothing happens. Let’s take an example, If department has many employees, If the department is deleted, Nothing happens to an employee. Employee assumes that its still asscoiated with deleted deparment.
Nullify
If the delete rule is set to Nullify to the relationship then the destination of the relationship gets nullify. In our case, If the department has many employees and department is deleted, the relationship between department and employee gets nullify.
This is default delete rule and we often use this rule in our project.
Cascade
This delete rule is important and makes sure for all possible scenarios while setting this rule to the realtionship. This rule is mostly used when data model has more dependency. Means in our case, If department has many employees and if department is deleted, automatically all employee belonging to that department are deleted.
Before using this rule please make sure your project requirement. Because this rule will delete all your records without any intimation if your relationship object is deleted.
Deny
This rule is powerful and simply opposite to the cascade rule. Instead of deletion of all your records in cascade rule, it prevents the deletion of records.
In our case, If department has many employees, department is only deleted if all employee belonging to same department are deleted or no employee is tied with the same department.
Transactions
Using SQL databases you have transactions. Using Core Data you can rely on NSManagedObjectContext and built-in UndoManager. There is a set of simple methods to manage current state:
-
save()– similar tocommit– persists all changes and resets undo stack. -
rollback()– discards all changes since lastsave(). -
undo()– reverts last change. -
redo()– reverts last undo action.
Core Data Concurrency
Core Data has built-in interfaces for managing operations across different threads. The most important things to keep in mind when supporting Core Data concurrency are:
-
A
NSManagedObjectContextmust perform operations on the thread it was created -
The
NSManagedObjectContextperform(_:)andperformAndWait(_:)functions are thread safe and can be called from other threads -
A
NSManagedObjectcannot be shared across threads -
A
NSManagedObjectIDcan be shared across threads -
Changes from one
NSManagedObjectContextcan be merged into anotherNSManagedObjectContext, even on another thread
In general, avoid doing data processing on the main queue that is not user-related. Data processing can be CPU-intensive, and if it is performed on the main queue, it can result in unresponsiveness in the user interface. If your application will be processing data, like importing data into Core Data from JSON, create a private queue context and perform the import on the private context.
Do not pass NSManagedObject instances between queues. Doing so can result in corruption of the data and termination of the app. When it is necessary to hand off a managed object reference from one queue to another, use NSManagedObjectID instances.
You retrieve the managed object ID of a managed object by calling the objectID accessor on the NSManagedObject instance.
Is Core Data Thread Safe?
Only some objects and functions in Core Data are thread safe. For example, NSManagedObject is not thread safe. However, NSManagedObjectID is thread safe. One way to get access to the same NSManagedObject across threads is to pass the NSManagedObjectID across threads and read the object:
let objectID = // a NSManagedObjectID

// Read the object using a managed object context
try context.existingObject(with: objectID)
Note: newly created Core Data objects have temporary object ids until the object is saved for the first time. Temporary object ids cannot be used to read objects on other threads.
Another example, NSManagedObjectContext contains both thread safe and not thread safe functions. For example, save() and fetch(_:) are not thread safe. However, perform(_:) and performAndWait(_:) are thread safe.
.mainQueueConcurrencyType
The .mainQueueConcurrencyType concurrency type is used for a NSManagedObjectContext on the main thread. A NSPersistentContainer has a property, viewContext, that is a reference to a NSManagedObjectContext with a .mainQueueConcurrencyType concurrency type:
// Get the main thread NSManagedObjectContext
// from a NSPersistentContainer
let context = persistentContainer.viewContext
If needed, a NSManagedObjectContext with a .mainQueueConcurrencyType concurrency type can be created directly:
// Use NSManagedObjectContext to directly create
// a main thread context
let context = NSManagedObjectContext(
    concurrencyType: .mainQueueConcurrencyType
)

// Set the persistent store coordinator so the
// managed object context knows where to save
// to and read from
context.persistentStoreCoordinator = // NSPersistentStoreCoordinator
.privateQueueConcurrencyType
A background NSManagedObjectContext has a concurrency type of .privateQueueConcurrencyType. Two common approaches to create a background NSManagedObjectContext with a .privateQueueConcurrencyType are using a NSPersistentContainerand directly withNSManagedObjectContext`:
// Use newBackgroundContext() with a
// NSPersistentContainer to create a
// background NSManagedObjectContext
let context = persistentContainer.newBackgroundContext()

// If needed, ensure the background context
// stays up to date with changes from
// the parent
context.automaticallyMergesChangesFromParent = true
// Use NSManagedObjectContext to directly
// create a background context
let context = NSManagedObjectContext(
    concurrencyType: .privateQueueConcurrencyType
)

// Set the parent context of the background context
context.parent = // NSManagedObjectContext

// If needed, ensure the background context
// stays up to date with changes from
// the parent
context.automaticallyMergesChangesFromParent = true
NSManagedObjectContext.perform
The perform(_:) function is thread safe and will run the provided code block asynchronously on the thread the NSManagedObjectContext was created on.
// Run the block asynchronously on the thread
// the context was created on
context.perform {
    // Perform background Core Data operations
    // ...
}

// Code after perform(_:) may run before the
// provided code block
NSManagedObjectContext.performAndWait
Like perform(_:), performAndWait(_:) is thread safe and will run the provided code block on the thread the NSManagedObjectContext was created on. Unlike perform(_:), performAndWait(_:) will run the provided code block synchronously and wait for the block to complete:
// Run the block synchronously on the thread
// the context was created on
context.performAndWait {
    // Perform background Core Data operations
    // ...
}

// Code after performAndWait(_:) will run
// after the provided code block
Core Data Background Context
There are multiple ways to use Core Data and a NSManagedObjectContext on a background thread. One way is the performBackgroundTask(_:) method on an NSPersistentContainer:
// Spawns a new thread and creates a background
// managed object context to perform operations
// in the background
persistentContainer.performBackgroundTask {
    (context) in
    // Perform background Core Data operations
    // ...
}
A drawback of performBackgroundTask(_:) is that performBackgroundTask(_:) creates a new thread. Calling performBackgroundTask(_:) repeatedly may negatively impact performance. Instead, newBackgroundContext() on a NSPersistentContainer can be used to create a background NSManagedObjectContext:
// Create a new background managed object context
let context = persistentContainer.newBackgroundContext()

// If needed, ensure the background context stays
// up to date with changes from the parent
context.automaticallyMergesChangesFromParent = true
In some cases a NSPersistentContainer may not be available. A background NSManagedObjectContext` can also be created explicitly:
// Create a new background context
let context = NSManagedObjectContext(
    concurrencyType: .privateQueueConcurrencyType
)

// Set the parent context
context.parent = // NSManagedObjectContext

// If needed, ensure the background context stays
// up to date with changes from the parent
context.automaticallyMergesChangesFromParent = true
Core Data Background Fetch Request
To get objects from a fetch request on a background thread, use perform(_:) or performAndWait(_:) on a background NSManagedObjectContext:
// Create a new background managed object context
let context = persistentContainer.newBackgroundContext()

// If needed, ensure the background context stays
// up to date with changes from the parent
context.automaticallyMergesChangesFromParent = true

// Perform operations on the background context
// asynchronously
context.perform {
    do {
        // Create a fetch request
        let fetchRequest: NSFetchRequest<CustomEntity>

        fetchRequest = CustomEntity.fetchRequest()
        fetchRequest.fetchLimit = 1

        let objects = try context.fetch(fetchRequest)

        // Handle fetched objects
    }
    catch let error {
        // Handle error
    }
}
Save Core Data On A Background Thread
Use perform(_:) or performAndWait(_:) to ensure save() is called on the background thread a managed object context was created on:
// Create a new background managed object context
let context = persistentContainer.newBackgroundContext()

// If needed, ensure the background context stays
// up to date with changes from the parent
context.automaticallyMergesChangesFromParent = true

// Perform operations on the background context
// asynchronously
context.perform {
    do {
        // Modify the background context
        // ...

        // Save the background context
        try context.save()
    }
    catch let error {
        // Handle error
    }
}
Create A New Core Data Object On A Background Thread
To create a new core data object in the background, use perform(_:) or performAndWait(_:) on a background NSManagedObjectContext:
// Create a new background managed object context
let context = persistentContainer.newBackgroundContext()

// If needed, ensure the background context stays
// up to date with changes from the parent
context.automaticallyMergesChangesFromParent = true

// Perform operations on the background context
// asynchronously
context.perform {
    do {
        // Create A New Object
        let object = CustomEntity(context: context)

        // Configure object properties
        // ...

        // Save the background context
        try context.save()
    }
    catch let error {
        // Handle errors
    }
}
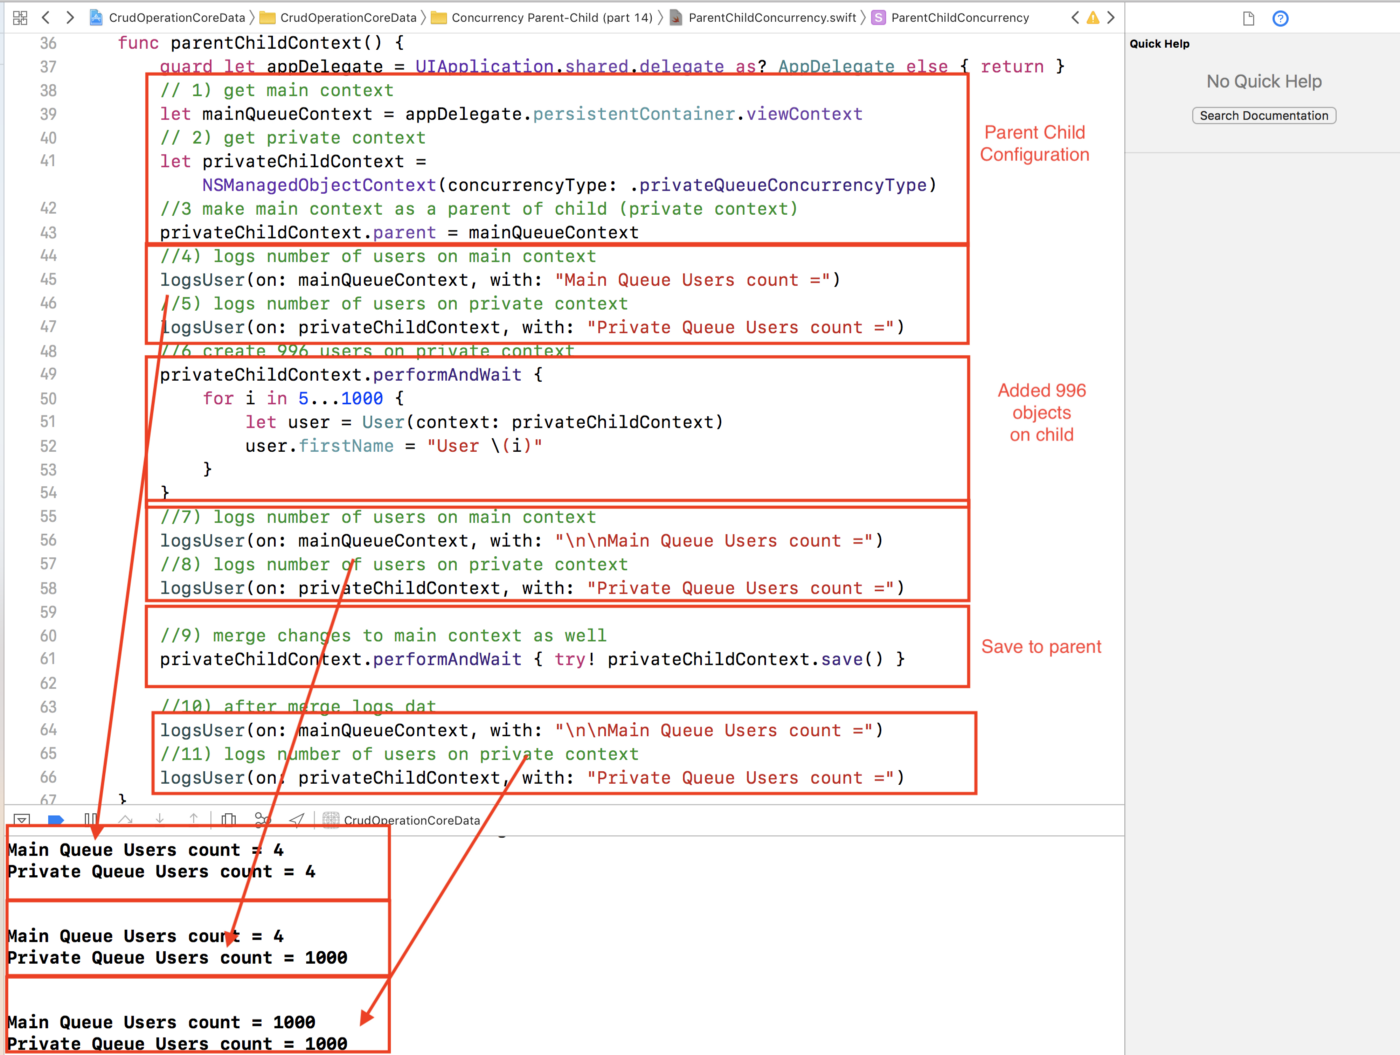
Parent/Child Managed Object Context
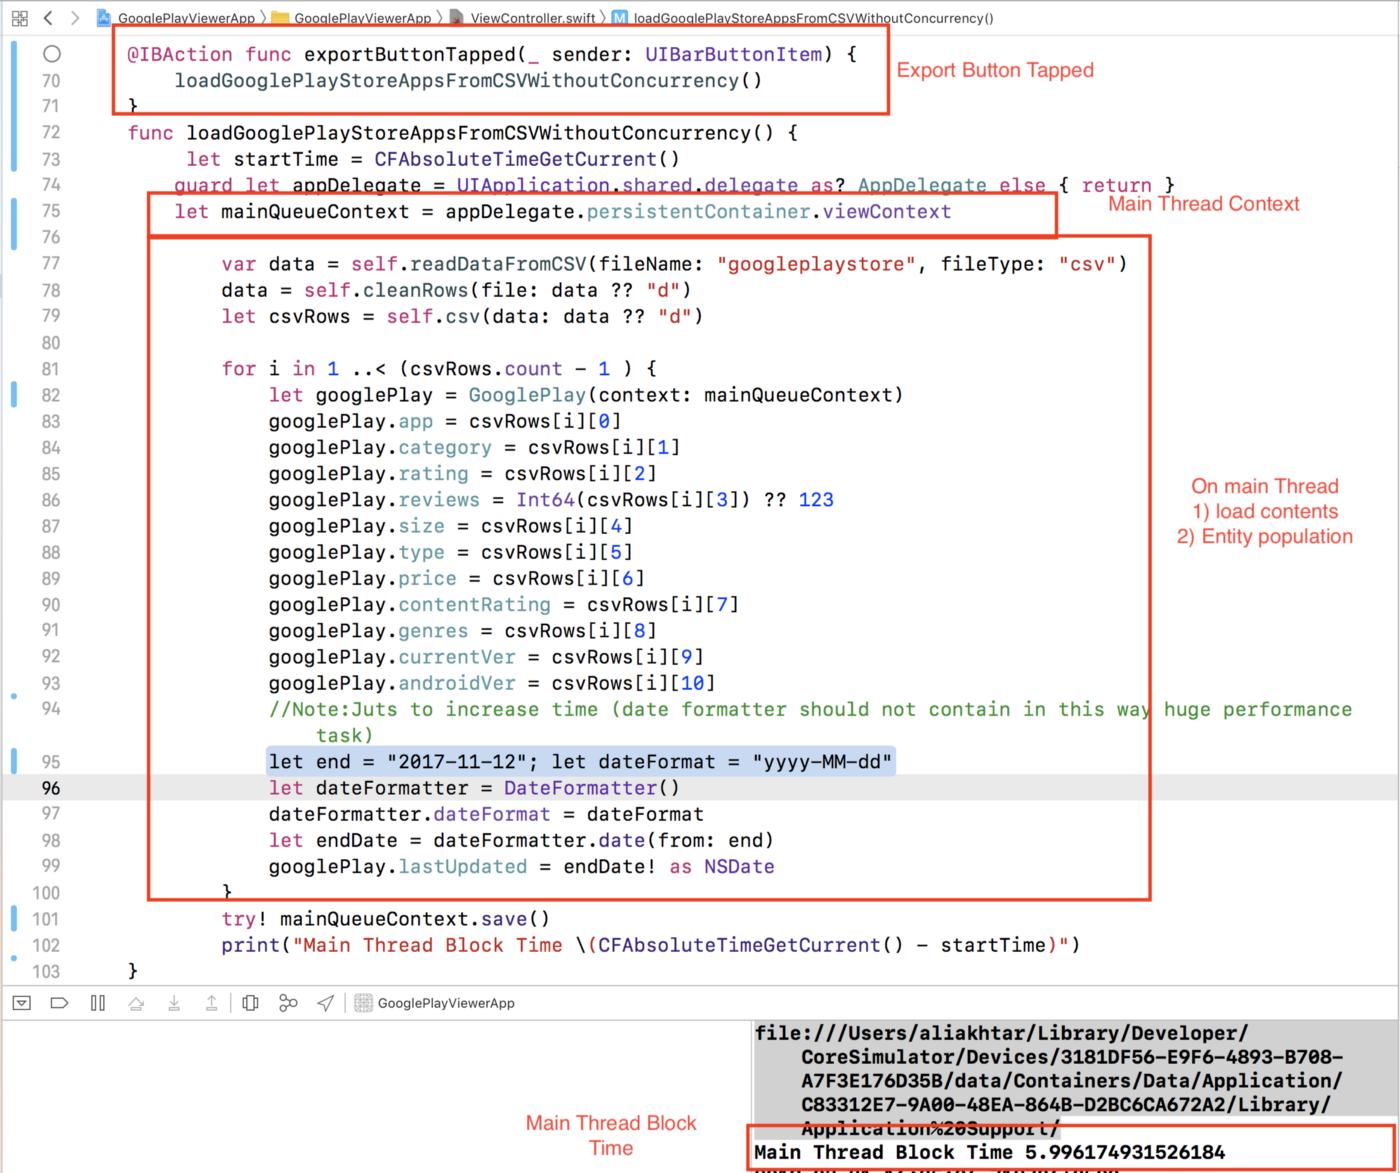
Performance Using Main Context
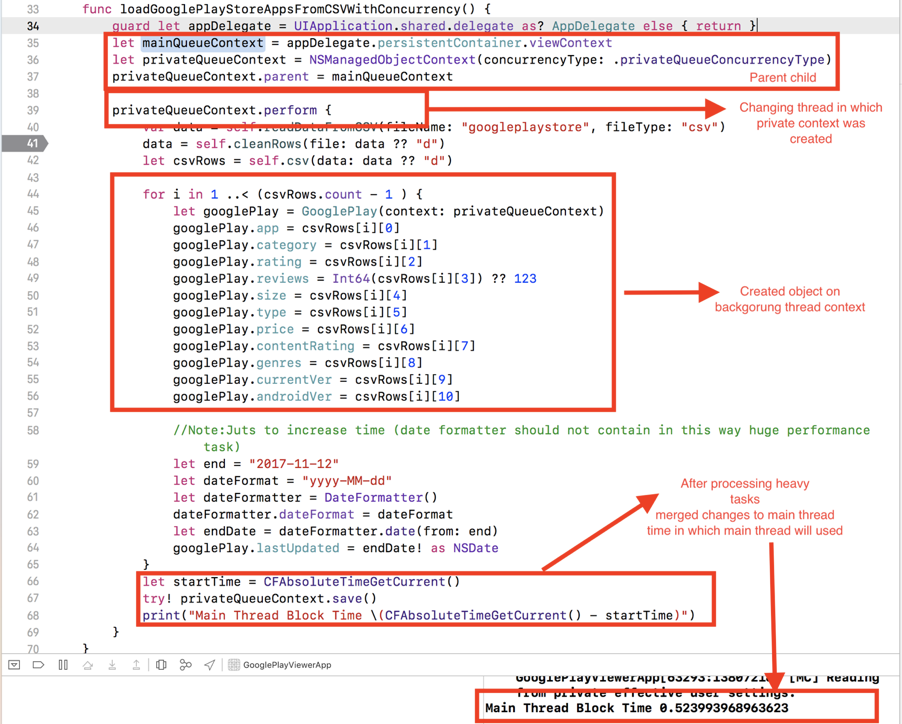
Improve Performance Using Concurrency
Fetch Requests
Get Object By ID
// Get the managed object ID of the object
let managedObject = // ... an NSManagedObject
let managedObjectID = managedObject.objectID

// Get a reference to a NSManagedObjectContext
let context = persistentContainer.viewContext

// Get the object by ID from the NSManagedObjectContext
let object = try context.existingObject(
    with: managedObjectID
)
Fetch A Single Object
// Configure a fetch request to fetch at most 1 result
let fetchRequest = // An NSFetchRequest
fetchRequest.fetchLimit = 1

// Get a reference to a NSManagedObjectContext
let context = persistentContainer.viewContext

// Fetch a single object. If the object does not exist,
// nil is returned
let object = try context.fetch(fetchRequest).first
Filter Fetch Request With Predicate
// Create a fetch request with a string filter
// for an entity’s name
let fetchRequest: NSFetchRequest<Entity>
fetchRequest = Entity.fetchRequest()

fetchRequest.predicate = NSPredicate(
    format: "name LIKE %@", "Robert"
)

// Get a reference to a NSManagedObjectContext
let context = persistentContainer.viewContext

// Perform the fetch request to get the objects
// matching the predicate
let objects = try context.fetch(fetchRequest)
Filter Predicate With Multiple Conditions
// Create a fetch request with a compound predicate
let fetchRequest: NSFetchRequest<Entity>
fetchRequest = Entity.fetchRequest()

// Create the component predicates
let namePredicate = NSPredicate(
    format: "name LIKE %@", "Robert"
)

let planetPredicate = NSPredicate(
    format: "country = %@", "Earth"
)

// Create an "and" compound predicate, meaning the
// query requires all the predicates to be satisfied.
// In other words, for an object to be returned by
// an "and" compound predicate, all the component
// predicates must be true for the object.
fetchRequest.predicate = NSCompoundPredicate(
    andPredicateWithSubpredicates: [
        namePredicate,
        planetPredicate
    ]
)

// Get a reference to a NSManagedObjectContext
let context = persistentContainer.viewContext

// Perform the fetch request to get the objects
// matching the compound predicate
let objects = try context.fetch(fetchRequest)
Fetch All Objects Of One Entity
// Create a fetch request for a specific Entity type
let fetchRequest: NSFetchRequest<Entity>
fetchRequest = Entity.fetchRequest()

// Get a reference to a NSManagedObjectContext
let context = persistentContainer.viewContext

// Fetch all objects of one Entity type
let objects = try context.fetch(fetchRequest)
Queries Using NSPredicate
With LIKE, CONTAINS, MATCHES, BEGINSWITH, and ENDSWITH you can perform a wide array of queries in Core Data with String arguments.
The examples below will query a Core Data database with a single entity description, Person. Person has a single attribute name, a String.
Exact String Match With A NSPredicate
The LIKE keyword in an NSPredicate will perform an exact string match.
let query = "Rob"
let request: NSFetchRequest<Person> = Person.fetchRequest()
request.predicate = NSPredicate(format: "name LIKE %@", query)

// The == syntax may also be used to search for an exact match
request.predicate = NSPredicate(format: "name == %@", query)
Additionally, the c and d modifiers can be used to perform a case-insensitive and diacritic insensitive (c would match ç as well) search:
let query = "Rob"
let request: NSFetchRequest<Person> = Person.fetchRequest()
request.predicate = NSPredicate(format: "name LIKE[cd] %@", query)
Contains String With A NSPredicate
The CONTAINS keyword in an NSPredicate will perform a contains string match.
let query = "Rob"
let request: NSFetchRequest<Person> = Person.fetchRequest()
request.predicate = NSPredicate(format: "name CONTAINS %@", query)
The c and d modifiers can also be used with CONTAINS to perform a case-insensitive. and diacritic insensitive (c would match ç as well) search.
NSPredicate Regex Search
The MATCHES keyword in an NSPredicate is used to perform a regular expression search.
let query = "??bert*"
let request: NSFetchRequest<Person> = Person.fetchRequest()
request.predicate = NSPredicate(format: "name MATCHES %@", query)
Search For Matches That Begin With String
The BEGINSWITH keyboard in an NSPredicate is used to perform a search for strings that begin with a specific substring.
let query = "R"
let request: NSFetchRequest<Person> = Person.fetchRequest()
request.predicate = NSPredicate(format: "name BEGINSWITH %@", query)
Search For Matches That End With String
The ENDSWITH keyboard in an NSPredicate is used to perform a search for strings that end with a specific substring.
let query = "R"
let request: NSFetchRequest<Person> = Person.fetchRequest()
request.predicate = NSPredicate(format: "name ENDSWITH %@", query)
Migrations
When is a migration necessary? The easiest answer to this common question is “when you need to make changes to the data model.”
To start the migration process, Core Data needs the original data model and the destination model. It uses these two versions to load or create a mapping model for the migration, which it uses to convert data in the original store to data that it can store in the new store. Once Core Data determines the mapping model, the migration process can start in earnest.
Migrations happen in three steps:
-
First, Core Data copies over all the objects from one data store to the next.
-
Next, Core Data connects and relates all the objects according to the relationship mapping.
-
Finally, enforce any data validations in the destination model. Core Data disables destination model validations during the data copy.
Migrations can be handled using one of two techniques:
-
Lightweight Migration - when Core Data can automatically infer how the migration should happen and creates the mapping model on the fly.
-
Heavyweight Migration - when Core Data cannot infer how the migration should happen and so we must write a custom migration by providing a mapping model (
xcmappingmodel) and/or a migration policy (NSEntityMigrationPolicy).
Lightweight migration (automatic)
If changes in the new schema are not very complex then you can simply use lightweight migration. Core data will automatically infer the mapping model and perform the data migration.
You can use lightweight migration, when
-
New
entity/attribute/relationshipis added -
Any
entity/attribute/relationshipis removed -
The name or type of any
entity/attribute/relationshipis changed
Managing Changes to Entities and Properties
If you rename an entity or property, you can set the renaming identifier in the destination model to the name of the corresponding property or entity in the source model. Use the Xcode Data Modeling tool’s property inspector (for either an entity or a property) to set the renaming identifier in the managed object model. For example, you can:
-
Rename a Car entity to Automobile
-
Rename a Car’s color attribute to paintColor
The renaming identifier creates a canonical name, so set the renaming identifier to the name of the property in the source model (unless that property already has a renaming identifier). This means you can rename a property in version 2 of a model, then rename it again in version 3. The renaming will work correctly going from version 2 to version 3, or from version 1 to version 3.
Managing Changes to Relationships
Lightweight migration can also manage changes to relationships and to the type of relationship. You can add a new relationship or delete an existing relationship. You can also rename a relationship by using a renaming identifier, just like an attribute.
In addition, you can change a relationship from a to-one to a to-many, or a nonordered to-many to an ordered (and vice versa).
Managing Changes to Hierarchies
You can add, remove, and rename entities in the hierarchy. You can also create a new parent or child entity and move properties up and down the entity hierarchy. You can move entities out of a hierarchy. You cannot, however, merge entity hierarchies; if two existing entities do not share a common parent in the source, they cannot share a common parent in the destination.
Requesting Lightweight Migration
To perform lightweight migration, all you have to do is, set property shouldMigrateStoreAutomatically and shouldInferMappingModelAutomatically true.
let description = container.persistentStoreDescriptions.first
description?.type = NSSQLiteStoreType
description?.shouldMigrateStoreAutomatically = true
description?.shouldInferMappingModelAutomatically = true
Step by Step
-
Select your Data Model.
-
Open
Editormenu. -
Select
Add Model version… -
Select in
Navigator(left panel) your new version. -
Perform desired changes – add/remove attributes/entities.
Once the new version is ready, you can migrate your Data Model to the latest version:
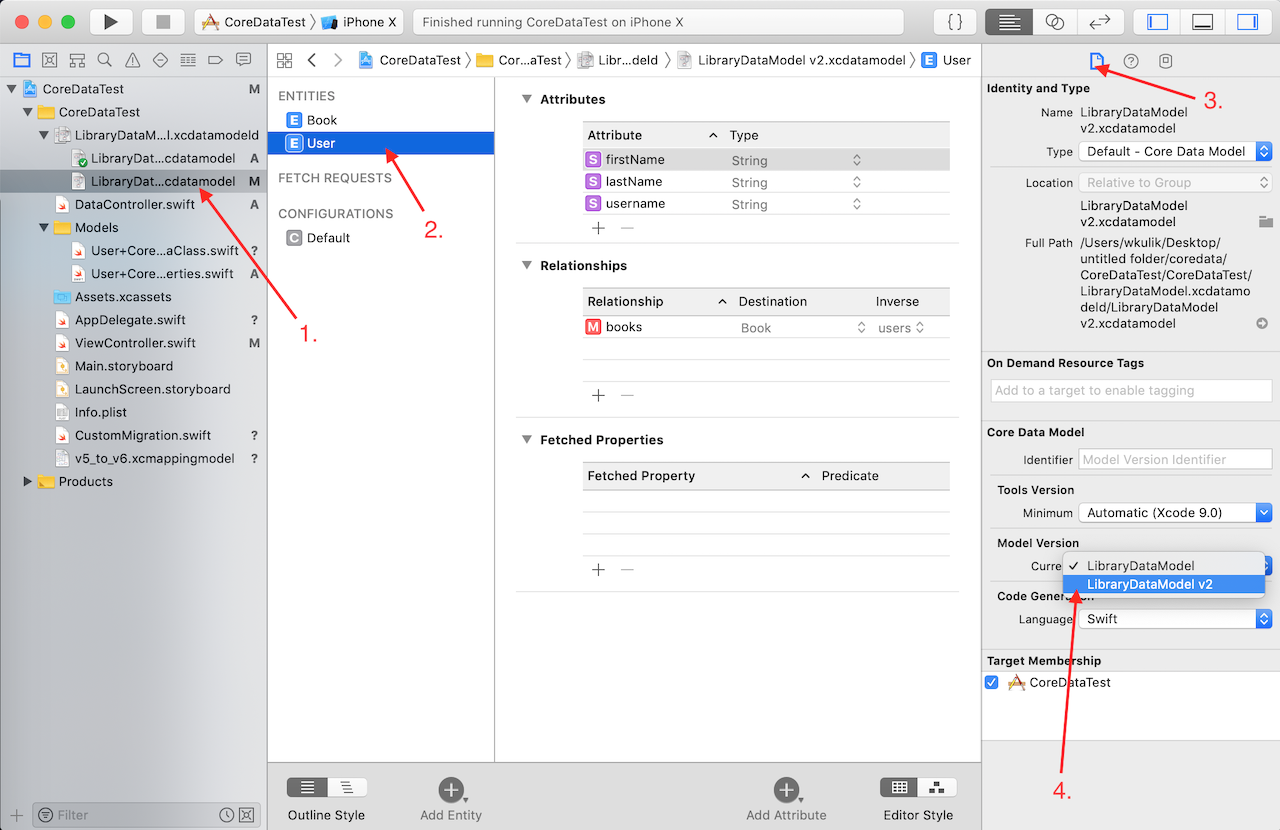
-
Select any version of Data Model.
-
Select any Entity (just to get a focus).
-
Select
File inspector. -
Set desired Model version.
Heavyweight migration
This migration is required when you need to perform custom mapping which can’t be handled automatically by Core Data. For example you may want to change attribute type from String to Integer 16 or divide value by 2.0.
Heavyweight migration is tricky and it’s very easy to make a mistake, so pay attention to details in all steps.
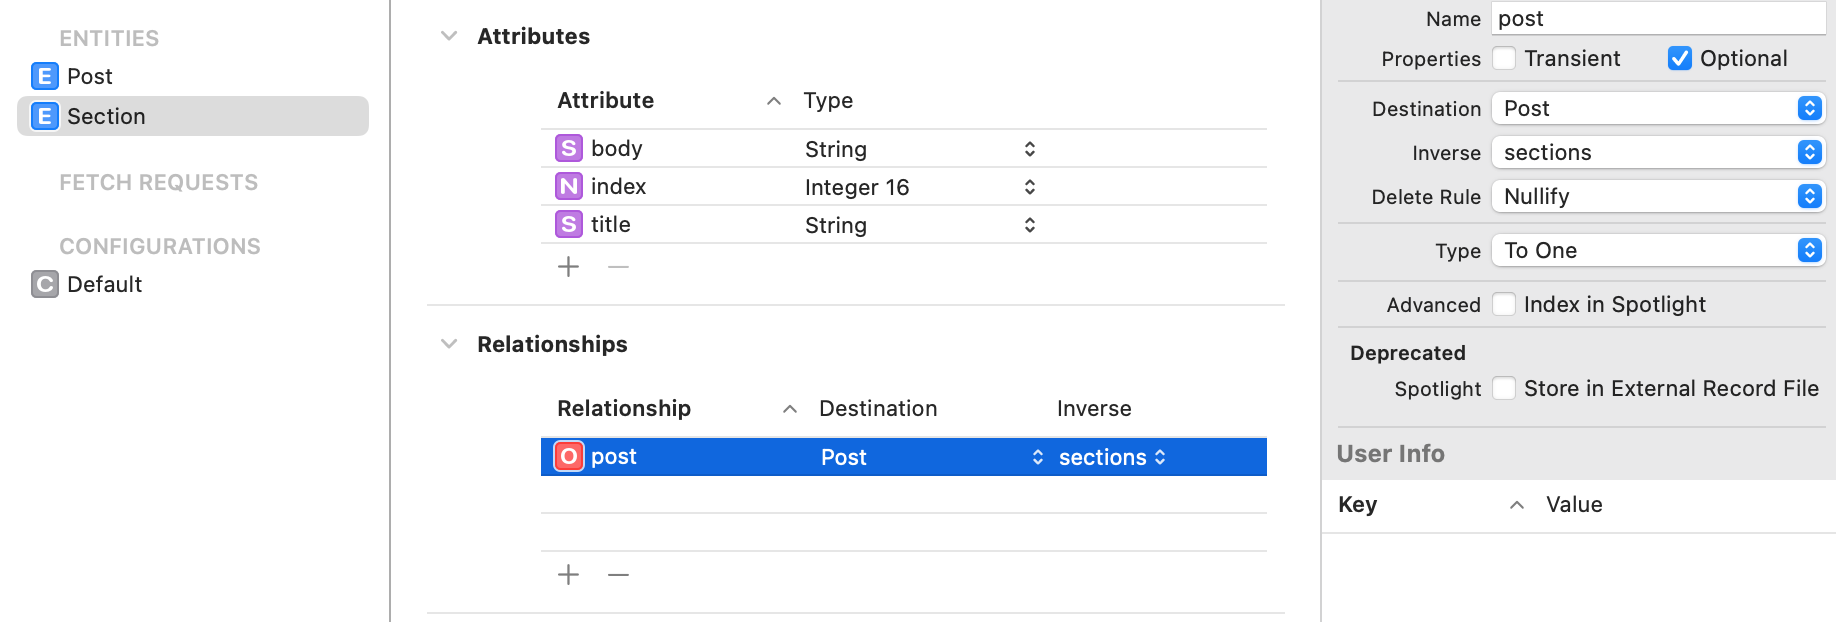
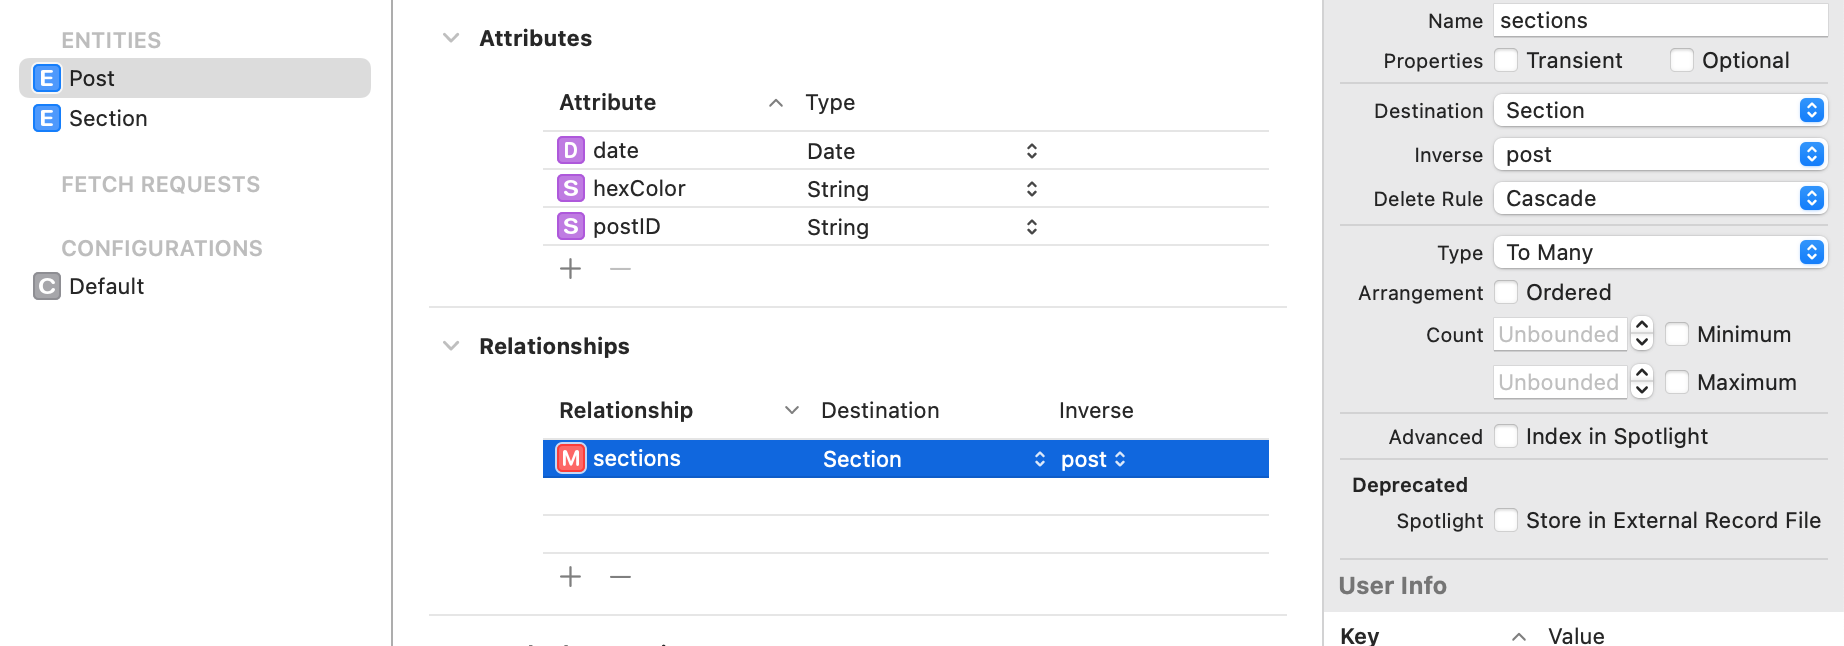
Step 1 - Add Model Version
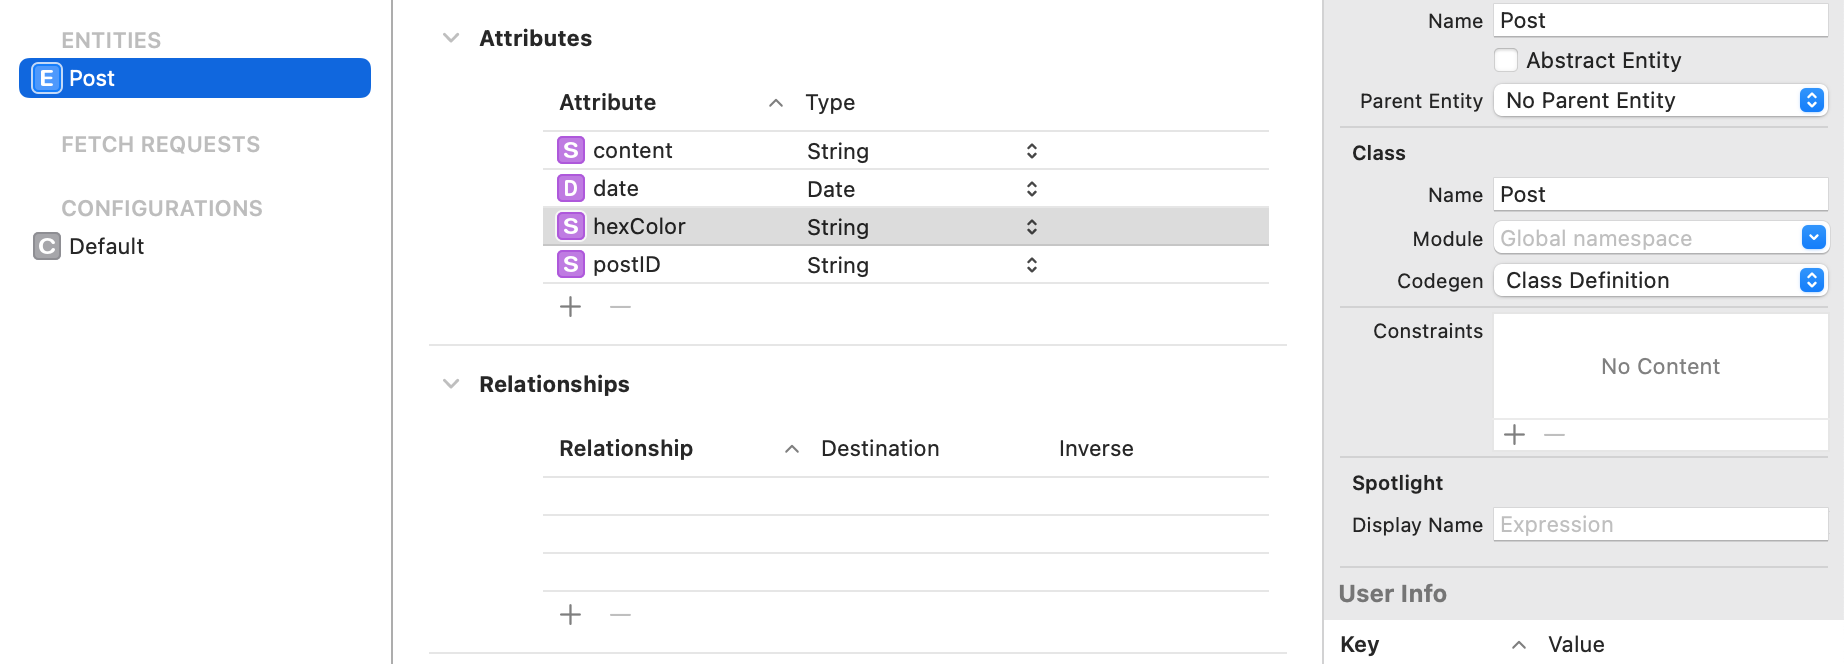
Example, we decide to expand our posting functionality by allowing the user to add multiple sections to a post.
Each section consists of:
- A title.
- A body.
- An index.
which in turn reduces a post to:
- A unique ID.
- A random associated colour represented as a hex string.
- The date the post was created on.
- A collection of sections.
Such that:
And:
Step 2 - Add Mapping Model
Create Mapping Model. This will open a wizard where you can select your source and destination model versions so in this case: CoreDataMigration_Example 2 and CoreDataMigration_Example 3.
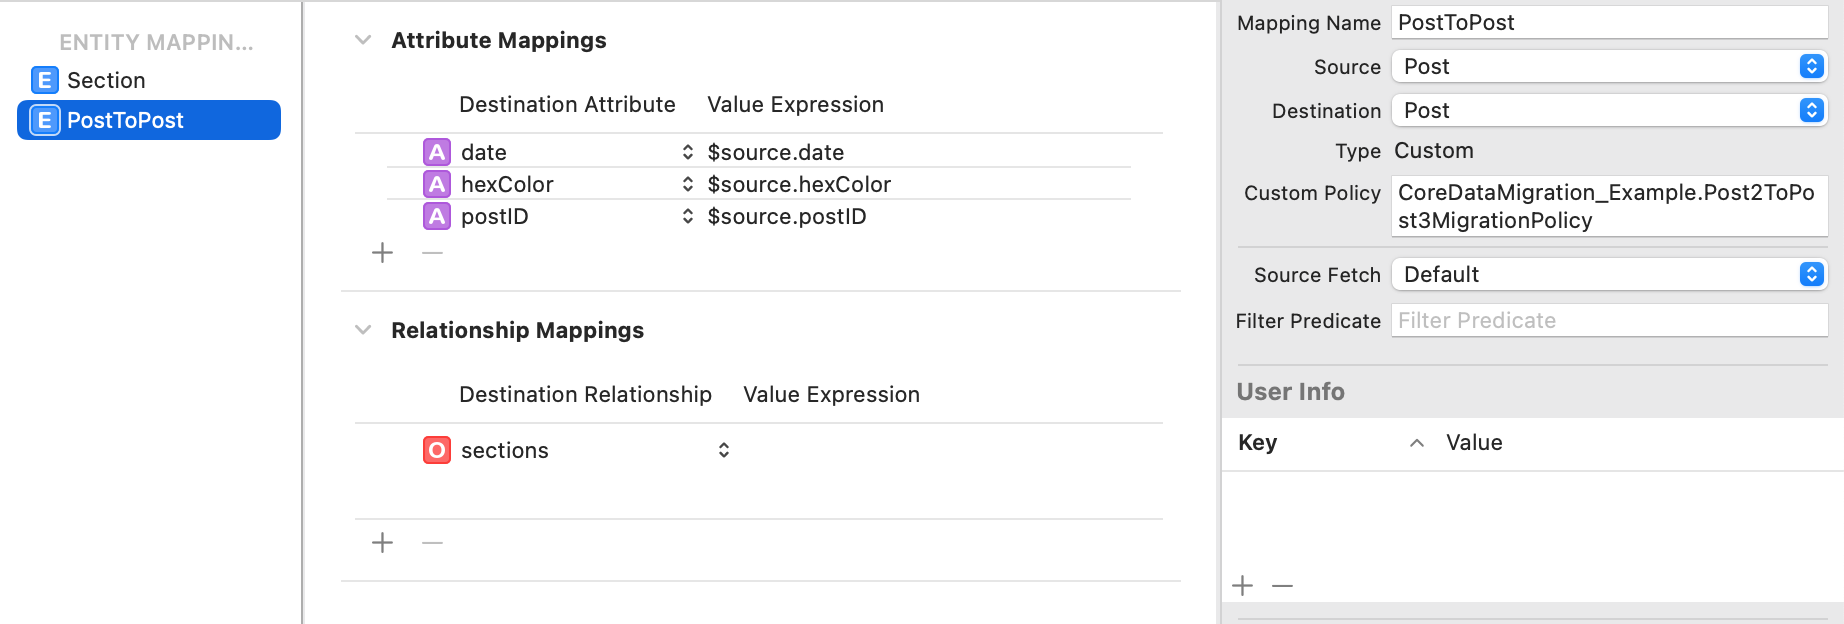
Step 3 - Custom NSEntityMigrationPolicy
Create a new class CustomMigration which inherits from NSEntityMigrationPolicy.
import CoreData

final class Post2ToPost3MigrationPolicy: NSEntityMigrationPolicy {

    override func createDestinationInstances(forSource sInstance: NSManagedObject, in mapping: NSEntityMapping, manager: NSMigrationManager) throws {
        try super.createDestinationInstances(forSource: sInstance, in: mapping, manager: manager)

        guard let destinationPost = manager.destinationInstances(forEntityMappingName: mapping.name, sourceInstances: [sInstance]).first else {
            fatalError("was expected a post")
        }

        let sourceBody = sInstance.value(forKey: "content") as? String
        let sourceTitle = sourceBody?.prefix(4).appending("...")

        let section = NSEntityDescription.insertNewObject(forEntityName: "Section", into: destinationPost.managedObjectContext!)
        section.setValue(sourceTitle, forKey: "title")
        section.setValue(sourceBody, forKey: "body")
        section.setValue(destinationPost, forKey: "post")
        section.setValue(0, forKey: "index")

        var sections = Set<NSManagedObject>()
        sections.insert(section)

        destinationPost.setValue(sections, forKey: "sections")
    }
}
In the right panel of Mapping Model, set Custom Policy on the PostToPost to CoreDataMigration_Example.Post2ToPost3MigrationPolicy, notice that it’s important to specify module here.
So now we are all done with the heavyweight migration thing. let’s run the app and perform data migration.
Core Data vs Realm
Realm seems to be more convenient solution right now, however I think it’s worth to learn both frameworks. Below there are some advantages of RealmSwift.
-
has built-in encryption
-
faster than Core Data (benchmark)
-
uses less space
-
a little bit simpler interface
-
easy migrations
-
easy fetching – no need to use NSFetchRequest
-
easy to use in multithreaded environment
-
support for auto-updating results
-
built-in observable notifications which allow to update UI
-
cross-platform library
-
support for cloud sync (extra paid)
-
Realm Studio which you can use to browse and manage database. It updates live when you open database from simulator’s storage.
-
really nice documentation and big community