on
Data Persistence in iOS
Data persistence means storing any type of data to disk so that the same data can be retrieved without being altered when the user opens the app next time. We are going to describe all the ways to store data locally in iOS apps.
By default when a user quits the app, all the variables and constants that were in memory get lost. To prevent this from happening we can use the following technologies:
-
UserDefaults
-
Keychain
-
Saving files to disk
-
Core Data
-
SQLite
-
Property Lists
UserDefaults
“An interface to the user’s defaults database, where you store key-value pairs persistently across launches of your app.” — Apple
As the name implies, we should use UserDefaults to store the user’s preferences. We should use it to store small pieces of information (e.g. whether the user prefers light or dark mode, at what time they want to receive a daily reminder, whether they actually want to receive notifications, etc). It’s not intended to save a lot of user generated data though! For that use case there are other possibilities on iOS.
As a rule of thumb, if you have a Settings screen in your app, UserDefaults are a good fit.
Pros
-
UserDefaults is easy to use and lightweight API
-
Shares data between the app and the app extensions
-
Thread safe (you can read and write values from any thread), without worrying about synchronization
Cons
-
It is possible to easily override the value for this same key (key collisions)
-
UserDefaults is not encrypted
-
Unit testing user defaults can occur with some false positives.
-
UserDefaults can be altered globally, from anywhere in the app, so you can run in inconsistent states easily
Easy to create a small extension to support the store and retrieve operations for any Codable type.
extension UserDefaults {

    func setCodable<T: Codable>(_ value: T, forKey key: String) {
        guard let data = try? JSONEncoder().encode(value) else {
            fatalError("Cannot create a json representation of \(value)")
        }
        self.set(data, forKey: key)
    }

    func codable<T: Codable>(forKey key: String) -> T? {
        guard let data = self.data(forKey: key) else {
            return nil
        }
        return try? JSONDecoder().decode(T.self, from: data)
    }
}
UserDefaults can be retrieved by using the standard static property, a singleton that gives easy access to this storage device.
Keychain
Some applications need to store private information or data we want to protect: passwords, certificates, and similar items.
For this specific use case, Apple provides the Keychain and the Security framework. The Keychain is a special file on the disk. It is hardware-encrypted and has a bunch of very low-level APIs to access it.
Consider that everything must be stored as Data. Therefore, we need to pass only objects and values that can be serialized into that type.
To use it, we need to:
-
Define a query dictionary.
-
Invoke a global function from the Security framework (depending on what we need, it can
SecItemCopyMatchingto retrieve some data,SecItemAddto add a new item,SecItemUpdateto update, orSecItemDeleteto remove it). -
Analyze the
OSStatuscode returned by the global function. -
If we are retrieving something, we need to cast the retrieved element to
Data.
    func save(_ password: String, for account: String) {
        let password = password.data(using: String.Encoding.utf8)!
        let query: [String: Any] = [kSecClass as String: kSecClassGenericPassword,
                                    kSecAttrAccount as String: account,
                                    kSecValueData as String: password]
        let status = SecItemAdd(query as CFDictionary, nil)
        guard status == errSecSuccess else { return print("save error")}
    }

    func getPassword(for account: String) -> String? {
        let query: [String: Any] = [kSecClass as String: kSecClassGenericPassword,
                                    kSecAttrAccount as String: account,
                                    kSecMatchLimit as String: kSecMatchLimitOne,
                                    kSecReturnData as String: kCFBooleanTrue]

        var retrivedData: AnyObject? = nil
        let _ = SecItemCopyMatching(query as CFDictionary, &retrivedData)


        guard let data = retrivedData as? Data else {return nil}
        return String(data: data, encoding: String.Encoding.utf8)
    }
If you actually need to use the Keychain in your app, search for a good library and let it do the dirty work for you. It will save you time and headaches. Here are the Keychain libraries with the most stars on GitHub like KeychainAccess, KeychainSwift
Pros
-
All items saved in keychain are encrypted (Keychain is the most secure data persistence layer in iOS)
-
There is a lot of open source wrappers with user-friendly Swift APIs
-
Thread safety
Cons
-
There is no handy and old-fashioned Keychain API, so you usually end up depending on an open-source project
-
Hard to unit test, unless you create your own wrapper around it
-
Speed: Reading or saving a lot of information into Keychain can be slow
-
Not recommended for storing large objects
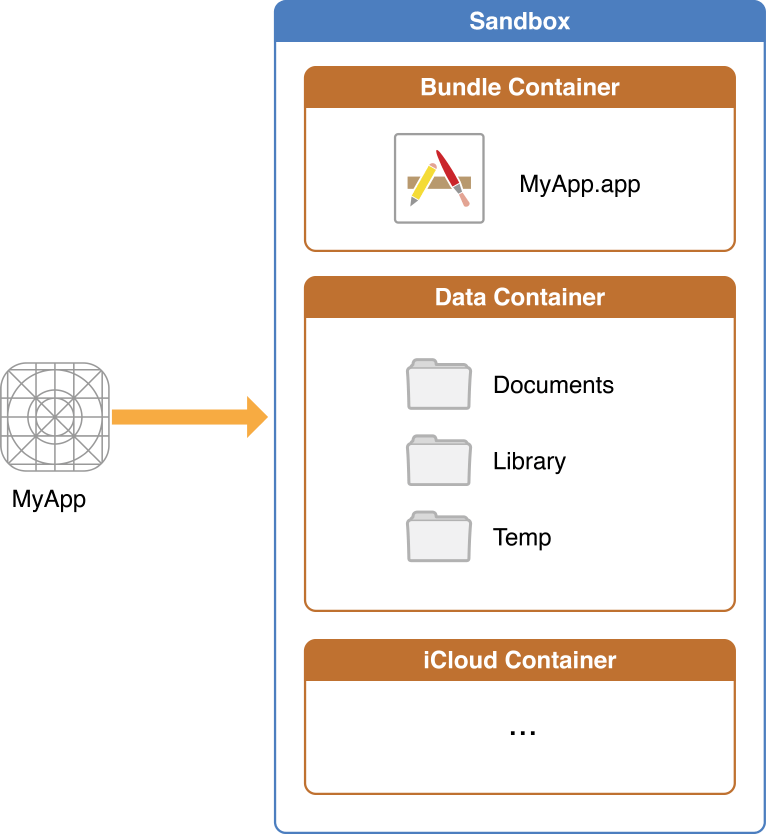
Saving Files to Disk
Apple makes writing, reading, and editing files inside the iOS applications very easy. Every application has a sandbox directory (called Document directory) where you can store your files. FileManager object provides all these functionalities with very simple APIs.
Files can be stored inside catalogs and sub-catalogs of your app’s Document directory. That’s why Apple recommends using the URL to specify and work with files using the FileManager object.
URL classes, in general, are used when working with a network like API requests and opening the websites. This use cases require adding https:// prefix for every URL to be created. For files, Apple requires using the “file://” prefix, which allows Apple to detect whether you are using the proper file URL. In iOS development, there are some preferred folders that all developers should know about:
-
Documents: This is the main folder where we can store data generated by the user. -
Documents/Inbox: This is a special folder created by the system whenever another app asks our app to open a file. This folder is read-only from the app’s perspective. The Mail program, for example, places email attachments associated with your app in this directory. -
Library: This is a folder where we, as developers, can store files required by the app. For example, we can store a binary file that can provide data to the app. -
Library/Caches: This is a special folder. Here, we can save files we might need soon but don’t care about losing. When we stop using these files, the system will delete them. Images we download to load the app faster should end up in this folder. -
Library/Application Support Directory: Store files in here that are required for your app but should never be visible to the user like your app’s database file.You can store files in here at the top level or create sub-directories. Content of the directory is persisted and included in the iCloud and iTunes backups.You can opt files out if they don’t need to be backed-up.Disk space used in the application support directory is reported in the storage settings UI under your app’s “Documents and Data” total. -
tmp: Another special folder. Files stored here are not persisted across launches of the app. The directory could be purged by the system.
The file system in the apps is sandboxed. Your app — and only your app — can access the file system at runtime. However, there are ways to access the files we stored in the disk from a backup.
For big files that need to be encrypted but cannot be stored in the Keychain, consider using the proper encryption option when writing them into a file. Reading and writing in iOS is extremely simple:
Pros
-
FileManager can be used with iCloud storage, so our app data is synchronized between all iOS and MacOS user devices
-
FileManager is thread-safe
-
FileManager can be used in many other ways, like listing directory contents, creating directories, moving, copying or removing files
-
You can store large objects (e.g. photos) to disk, as long as there is enough local storage on the device.
Cons
-
Creating URL paths can be error-prone
-
You cannot store the absolute URL of the given file, as the sandbox of the application can be moved
-
Speed penalty: Reading/saving files from disk can be very slow
Simple example in which we would like to save Data to a file on disk:
class FilesManager {

    enum Error: Swift.Error {
        case fileAlreadyExists
        case invalidDirectory
        case writtingFailed
    }

    let fileManager: FileManager

    init(fileManager: FileManager = .default) {
        self.fileManager = fileManager
    }

    func save(fileNamed: String, data: Data) throws {
        guard let url = makeURL(forFileNamed: fileNamed) else {
            throw Error.invalidDirectory
        }
        if fileManager.fileExists(atPath: url.absoluteString) {
            throw Error.fileAlreadyExists
        }
        do {
            try data.write(to: url)
        } catch {
            debugPrint(error)
            throw Error.writtingFailed
        }
    }

    // The method is responsible for creating the URL of the file with the given name.
    // As mentioned, we can only write to the documents directory with .userDomainMask.
    private func makeURL(forFileNamed fileName: String) -> URL? {
        guard let url = fileManager.urls(for: .documentDirectory, in: .userDomainMask).first else {
            return nil
        }
        return url.appendingPathComponent(fileName)
    }
}
CoreData
Core Data is the Object-Relational Mapping (ORM) framework that comes with iOS. In most common examples CoreData is used as a wrapper for the SQLite database and it’s used to save and present any type of user data.
In Core Data, we create a DataModel that is managed by a Context. The Context then coordinates with a StorePersistor whose responsibility is to store and retrieve data from the disk.
Under the hood, Core Data uses an SQLite database that is stored in the Library/Application Support folder. However, it is possible to pass a custom URL to move the database from the default location.
Core Data shines when we need to keep track of a complex object model with several entities and relationships. It has advanced control over contexts and multi-threading, which makes it easy to modularize access to data.
If you are building a big and complex application already divided into modules, Core Data could be a nice addition to your toolbox.
Functionalities
-
Query-free SQL database wrapper
-
Easy to read data on the main thread
-
Easy to use background thread data saving
-
Easy to setup in-memory database (e.g. for caching, or unit testing)
-
Out of the box support for automatic migrations of the database between app releases
-
Easy to setup database modeling tool (with Interface Builder)
Pros
-
CoreData is simple to set up and use
-
Lots of additional tools provided by Apple for fetching data https://developer.apple.com/documentation/coredata/nsfetchedresultscontroller
-
Speed & Performance: Possibility to be a cache when setup
in memory -
Out-of-the-box database migrations (simple one)
Cons
-
Quite advanced threading policy
-
Being forced to use
NSManagedObjectsubclasses for every new object in the database -
Sometimes
NSManagedObjectContexthave problems with synchronizing database changes
Core Data Example
To setup CoreData in the app, we need to do the following steps:
-
Create
DataModelobject -
Create
Entitiesinside theDataModeltool -
Create
CoreDatastack -
Fetch
NSManagedObjectContext
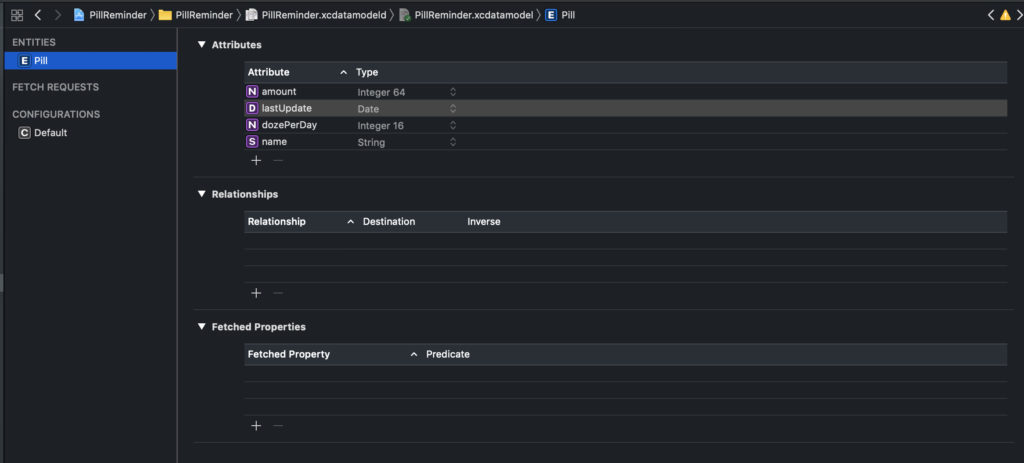
Let’s create a DataModel. Apple recommends using the application name as DataModel name.
Now, we can create a CoreData stack. The stack should store NSPersistentContainer, and give access to mainContext (which is a NSManagedObjectContext object) – this one should be used for fetching the data and to create background contexts which are responsible for saving the data.
class CoreDataManager {
    static let shared = CoreDataManager()

    private init() {}

    private lazy var persistentContainer: NSPersistentContainer = {
        let container = NSPersistentContainer(name: "PillReminder")
        container.loadPersistentStores(completionHandler: { _, error in
            _ = error.map { fatalError("Unresolved error \($0)") }
        })
        return container
    }()

    var mainContext: NSManagedObjectContext {
        return persistentContainer.viewContext
    }

    func backgroundContext() -> NSManagedObjectContext {
        return persistentContainer.newBackgroundContext()
    }
}
Loading an array of pills:
func loadPills() -> [Pill] {
    let mainContext = CoreDataManager.shared.mainContext
    let fetchRequest: NSFetchRequest<Pill> = Pill.fetchRequest()
    do {
        let results = try mainContext.fetch(fetchRequest)
        return results
    }
    catch {
        debugPrint(error)
    }
}
To save a new Pill entity, we need to perform the following steps:
func savePill(name: String) throws {
    let context = CoreDataManager.shared.backgroundContext()
    context.perform {
        let entity = Pill.entity()
        let pill = Pill(entity: entity, insertInto: context)
        pill.name = name
        pill.amount = 2
        pill.dozePerDay = 1
        pill.lastUpdate = Date()
        try context.save()
    }
}
-
context.performis a requirement for being thread-safe because all operations of the given context need to be performed on the context queue. -
let entity = Pill.entity()is creating the entity, which is required to create an empty database row -
Then we can create a Pill object
Pill(entity: entity, insertInto: context) -
last, but not least, try
context.saveis saving the context and informing other contexts that database changes were performed
SQLite
SQLite is a relational database management system contained in a C programming library. In contrast to many other database management systems, SQLite is not a client-server database engine. In fact, it is embedded in the client application itself. So there is no networking involved in SQLite.
The most common purpose of using SQLite in the app is a possibility to make some data read/write optimizations on the database level, which cannot be done using CoreData. This topic is very wide, so I would like to encourage you to get familiar with the following wrapper for SQLite: https://github.com/groue/GRDB.swift.
Pros
-
Lightweight & Fast
-
Stable cross-platform database (portable across all 32-bit and 64-bit operating systems)
-
No installation needed
Cons
-
Limited traffic (low to medium HTTP requests)
-
Restricted database size (usually to 2GB)
-
Lack of built-in data encryption
-
Only allows single write at one time
Property Lists
Plist files work by storing serialised objects with key/value conventions. You’ve probably heard of the Info.plist file. It stores application settings values like the name, version number, etc.
You can store String, Number, Bool, Array, Dictionary, Date, Data
Information stored inside the application’s Info.plist file can be read using the Bundle.main.infoDictionary with subscript access. Fetching the bundle identifier is simple as:
let bundleIdentifire = Bundle.main.infoDictionary[kCFBundleIdentifierKey] as? String
Pros
-
Plist files can be used to specify some app environment values, like base backend URL, application keys, shared regex strings. They are a better fit for this, than let’s say, Swift classes.
-
Plist files are very easy to read both for humans and computers
Cons
-
Working with String keys can be error-prone
-
It’s easy to break plist files with some unclosed </> key or value input
-
You can only store small objects of primitive types
Example
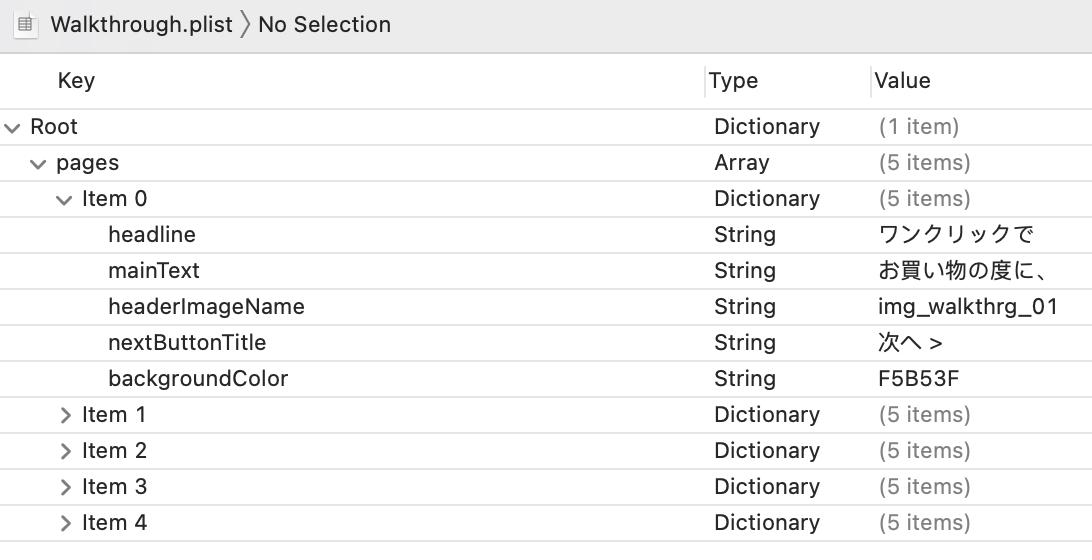
struct WalkthroughSinglePageViewModel {

    let headerImageName: String
    let headline: String
    let mainText: String
    let nextButtonTitle: String
    let backgroundColor: String

    init(dictionary: [String: Any]) {
        self.headerImageName = dictionary["headerImageName"] as? String ?? ""
        self.headline = dictionary["headline"] as? String ?? ""
        self.mainText = dictionary["mainText"] as? String ?? ""
        self.nextButtonTitle = dictionary["nextButtonTitle"] as? String ?? ""
        self.backgroundColor = dictionary["backgroundColor"] as? String ?? "FFFFFF"
    }
}

struct WalkthroughViewModel {
    private var pages: [WalkthroughSinglePageViewModel]

    init() {
        guard let url = Bundle.main.url(forResource: "Walkthrough", withExtension: "plist") else {
            fatalError("Missing Resource File")
        }
        guard let dictionary = NSDictionary(contentsOf: url) else {
            fatalError("Corrupted Resource File")
        }
        guard let pageDictionaries = dictionary["pages"] as? [[String : Any]] else {
            fatalError("Corrupted Resource File")
        }
        self.pages = pageDictionaries.map({ dictionary in
            return WalkthroughSinglePageViewModel(dictionary: dictionary)
        })
    }

    var numberOfPages: Int {
        return pages.count
    }

    func page(atIndex index: Int) -> WalkthroughSinglePageViewModel {
        return pages[index]
    }
}
Reading a Plist with Swift
func getPlist(withName name: String, key: String) -> Any? {
    if  let path = Bundle.main.path(forResource: name, ofType: "plist"),
        let myDict = NSDictionary(contentsOfFile: path) {
        return myDict[key]
    }
    return nil
}

// Here’s how we can use the above function:
if let fruits = getPlist(withName: "Fruit") as? [String] {
    print(fruits) // Output: ["Orange", "Pineapple", "Raspberry", ]
}
Reading a Plist with Codable
struct Preferences: Codable {
    var webserviceURL:String
    var itemsPerPage:Int
    var backupEnabled:Bool
}

if  let path        = Bundle.main.path(forResource: "Preferences", ofType: "plist"),
    let xml         = FileManager.default.contents(atPath: path),
    let preferences = try? PropertyListDecoder().decode(Preferences.self, from: xml)
{
    print(preferences.webserviceURL)
}
Writing Data to a Plist
let preferences = Preferences(webserviceURL: "https://api.twitter.com",
                              itemsPerPage: 10,
                              backupEnabled: false)

let encoder = PropertyListEncoder()
encoder.outputFormat = .xml

let path = FileManager.default.urls(for: .documentDirectory, in: .userDomainMask)[0].appendingPathComponent("Preferences.plist")

do {
    let data = try encoder.encode(preferences)
    try data.write(to: path)
} catch {
    print(error)
}