on
Scene Delegate vs AppDelegate
Earlier to Xcode 11/iOS 13, when you create a new project, some default files like AppDelegate.swift, ViewController.swift and a Main.storyboard and few other files were created but from Xcode 11 you might have noticed that along with the default files like above, a new file SceneDelegate.swift is also created.
If you’re still confused about what is app life cycle and AppDelegate. Please read my blog application life cycle in iOS.
I hope by now you’re aware of AppDelegate, how app delegate interact to user event and app life cycle. Now it’s time to discuss why this new file is created and how to use that scene delegate in your application development.
Advantages of SceneDelegate
-
From iOS 13, the responsibilities of AppDelegate have been split between AppDelegate and SceneDelegate.
-
This is the result of new multi-window support feature that is introduced with iPad-OS.
-
The
UISceneAPI allows us to create multiple instances of our app’s UI as separate instances in the application switcher.
What are the changes with the new scene API?
To understand the changes to the application lifecycle you need to know about the following core objects of the new scene API.
UIScene and UISceneDelegateClassName
-
Now app can run multiple instance of UI at the same time.
-
Appdelegate is no longer responsible for setting up the UI and handling UI related lifecycle events, such as going to the foreground or background.
-
Every instance of apps UI is represented by
UISceneobject. -
How
UIApplicationnotify app events through the app delegate, a scene does this through scene delegate -
You typically work with
UIWindowSceneandUIWindowSceneDelegate
UIWindowScene
-
UIWindowSceneis a subclass ofUISceneand the most common type of scene you’ll interact with. -
You shouldn’t instantiate
UIWindowScenedirectly. UIKit will create it for you
UIWindowSceneDelegate
UIWindowSceneDelegateis a delegate protocol that extends fromUISceneDelegateand contains the core methods which are used to respondUIWindowScenelifecycle events.
UISceneSession
-
The life cycle of scene sessions is handled by
UIApplicationDelegate -
Every scene(window) is managed by an
UISceneSession -
Which holds all the configuration data and state restoration data needed to create a scene object.
UISceneConfiguration
- This object contains information that tells UIKit how to instantiate your scene. You configure a
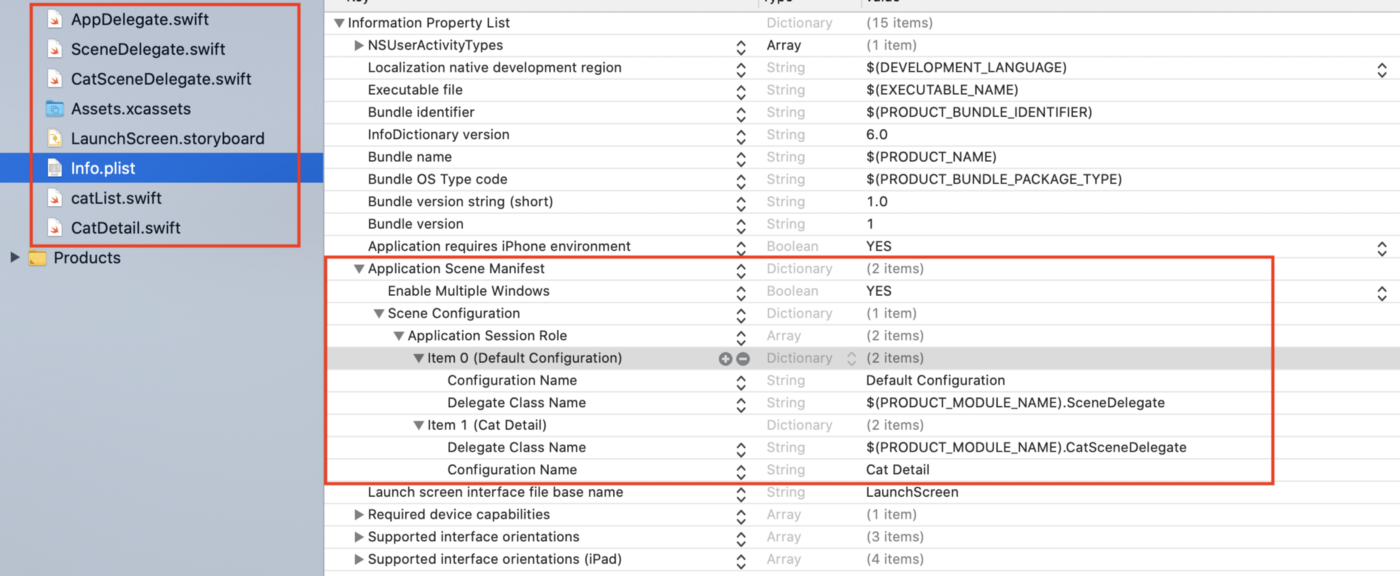
UISceneConfigurationin code or in your Info.plist. This looks as follows

-
Application Session Rolesuggest that you can have multiple configurations in yourInfo.plist. -
Enable Multiple Windowskey is false by default. -
Setting
Enable Multiple Windowsproperty toYESwill allow users to open multiple windows of your application on iPadOS (or even on macOS)
The most important information is kept inside the items in the Application Session Role array is
-
The name of this configuration, which needs to be unique
-
The class name of the scene UIWindowScene
-
The class name of the delegate for this scene, which is normally SceneDelegate
-
The name of the storyboard that contains the initial UI for this scene — If your using storyboard set this property else no need.
Changes to the AppDelegate and it’s responsibilities
-
This is still main entry point for iOS 13+ application. System calls appdelegate methods for application level life cycle events.
-
In apple’s default templet, you can find below three methods.
func application(_:didFinishLaunchingWithOptions:) -> Bool
-
This method is used to perform application setup.
-
In iOS 12 or earlier, you might have used this method to create and configure a UIWindow object and assigned a UIViewController instance to the window to make it appear.Now appdelegate is no longer responsible for this
func application(_:configurationForConnecting:options:) -> UISceneConfiguration
-
This method is called whenever your application is expected to supply a new scene, or window for iOS to display.
-
This method is not called when your app launches initially, it’s only called to obtain and create new scenes
func application(_:didDiscardSceneSessions:)
-
This method is called whenever a user discards a scene.
-
You can use this function to dispose of resources that these scenes used, because they’re not needed anymore.
In addition to these default methods, AppDelegate can still be used to open URLs, catch memory warnings, detect when your app will terminate, detect when a user has registered for remote notifications and more.
UISceneConfiguration
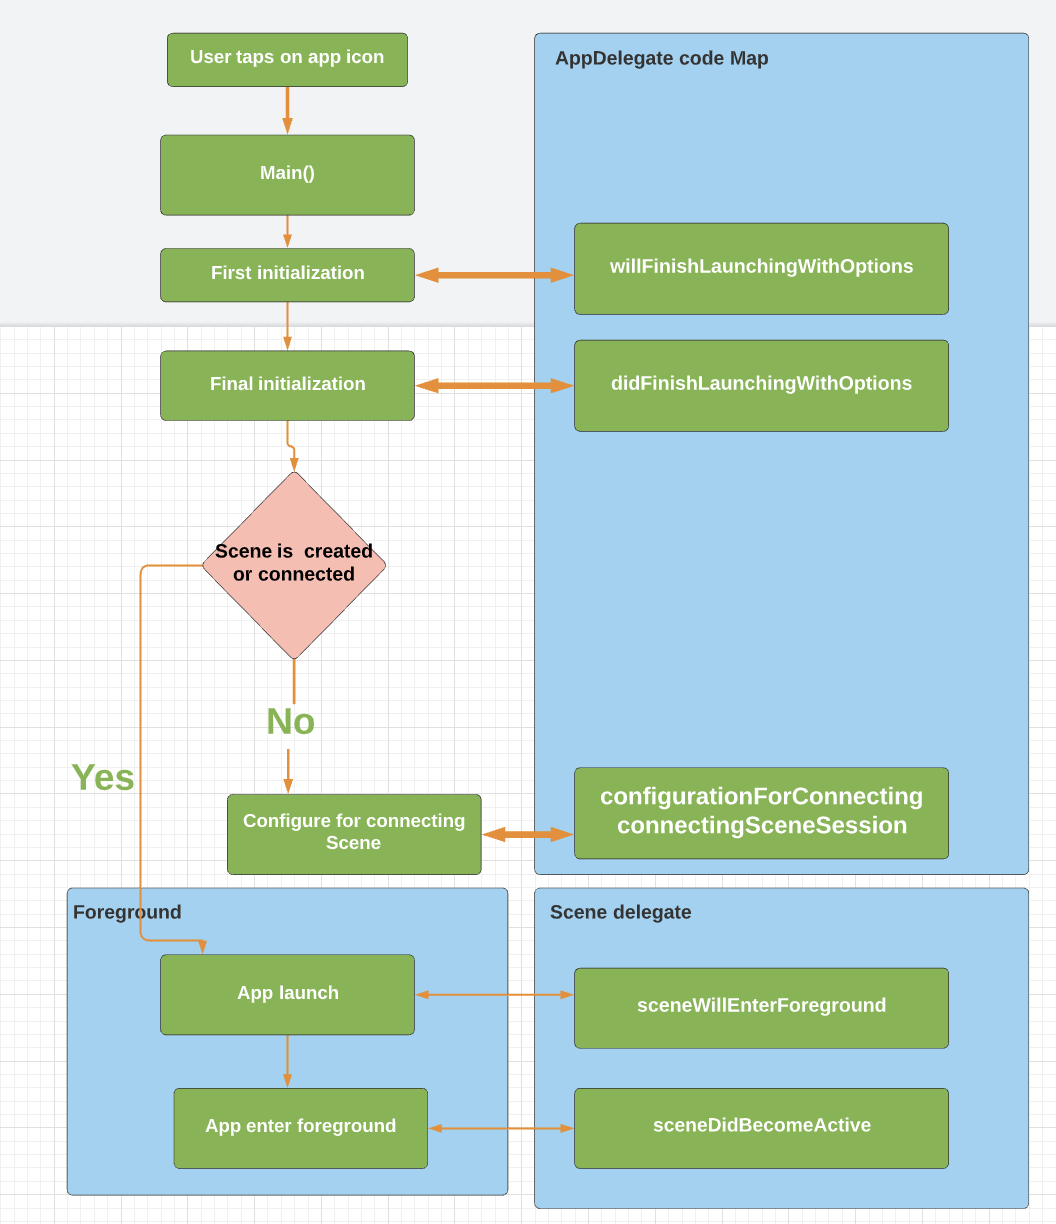
There are several methods in the SceneDelegate.swift file by default:
1/ sceneDidDisconnect(_:) is called when a scene has been disconnected from the app (Note that it can reconnect later on.)
2/ sceneDidBecomeActive(_:) is called when the user starts interacting with a scene, such as selecting it from the app switcher
3/ sceneWillResignActive(_:) is called when the user stops interacting with a scene, for example by switching to another scene
4/ sceneWillEnterForeground(_:) is called when a scene enters the foreground, i.e. starts or resumes from a background state
5/ sceneDidEnterBackground(_:) is called when a scene enters the background, i.e. the app is minimised but still present in the background.
Life Cycle of Scene

Adding multiple scene programatically
Before starting make sure the device Supports multiple windows.
In this blog, i’m going to explain how to add multiple scene by considering bellow example. Here I’m taking two viewcontroller which are:
-
List viewcontroller which contain cat images called
catList.swift, -
Click on any cat image will land you to the detail view controller called
CatDetail.swift, which gives some info of cat. -
If your using xcode 11+, default scene delegate will be added to the project which is called
SceneDelegate— I’m using this file to load catList scene -
Create a new file which is
UIRespondersubclass and let it conform to theUIWindowSceneDelegateand add a window property. Call this file asCatSceneDelegate.swift— I’m using this file to load cat detail scene -
click on the plus icon next to the Application Session Role keyword in
info.plist. add delegate class name and configuration name forSceneDelegateandCatSceneDelegate. -
Now your project directory should look like this

- load viewcontroller into window(scene) in respective delegate file.

-
Create an
NSUserActivitythat contains all information needed to determine that we want to show in detail page after tap cat image in catList. -
we call
requestSceneSessionActivation(_:userActivity:options:errorHandler:)onUIApplication.sharedto initiate the request to launch a new scene. When we call this method,application(_:configurationForConnecting:options:)is called onAppDelegate.
func didTapCat() {

  let activity = NSUserActivity(activityType: "viewCatDetail")

  //Add targetContentIdentifier
  activity.targetContentIdentifier = "new"

  let session = UIApplication.shared.openSessions.first { openSession in
    guard let sessionActivity = openSession.scene?.userActivity,
          let targetContentIdentifier = sessionActivity.targetContentIdentifier else {
      return false
    }
    return targetContentIdentifier == activity.targetContentIdentifier
  }

  UIApplication.shared.requestSceneSessionActivation(session, userActivity: activity, options: nil, errorHandler: nil)

}
- Return an appropriate UISceneConfiguration from
application(_:configurationForConnecting:options:)method that matches a configuration that’s in yourInfo.plist. It looks as follow:
func application(_ application: UIApplication, configurationForConnecting connectingSceneSession: UISceneSession, options: UIScene.ConnectionOptions) -> UISceneConfiguration {
  if let activity = options.userActivities.first, activity.activityType == "viewCatDetail" {
    return UISceneConfiguration(name: "Cat Detail", sessionRole: connectingSceneSession.role)
  }
  return UISceneConfiguration(name: "Default Configuration", sessionRole: connectingSceneSession.role)
}
- If you want to load detail screen with some identifier then use bellow code in scene delegate file.
func scene(_ scene: UIScene, willConnectTo session: UISceneSession, options connectionOptions: UIScene.ConnectionOptions) {
  if let activity = connectionOptions.userActivities.first ?? session.stateRestorationActivity,
    let identifier = activity.targetContentIdentifier {
      //load your view into widow.
  }
}
targetContentIdentifier is a string that identifies the content of the NSUserActivity, for matching against existing documents when re-opening to see if they are the same.
- Finally run app in ipad, your app looks like this

or we can drag and drop one scene above the other

- If you run your app and pause it with the view hierarchy debugger something looks like bellow:

How can we add multiple story board in scene delegate?
-
Create multiple story board and those into the info.plist.
-
Follow same steps as above to display multiple window. your project look similar as bellow.

Adding a scene delegate to an existing project
Step 1:
Add a UIApplicationSceneManifest to the info.plist. There are two way you can add it
1/ Click on your project in the project navigator -> click on your app’s target -> check the Supports multiple windows checkbox under deployment info.

2/ Right-click on the info.plist and choose Open as -> Source Code and copy-paste the following code snippet into it.
<key>UIApplicationSceneManifest</key>
<dict>
    <key>UIApplicationSupportsMultipleScenes</key>
    <true/>
    <key>UISceneConfigurations</key>
    <dict>
        <key>UIWindowSceneSessionRoleApplication</key>
        <array>
            <dict>
                <key>UISceneConfigurationName</key>
                <string>Default Configuration</string>
                <key>UISceneDelegateClassName</key>
                <string>$(PRODUCT_MODULE_NAME).SceneDelegate</string>
                <key>UISceneStoryboardFile</key>
                <string>Main</string>
            </dict>
        </array>
    </dict>
</dict>
Step 2:
Go to your app delegate and implement application(_:configurationForConnecting:options:)
func application(_ application: UIApplication, configurationForConnecting connectingSceneSession: UISceneSession, options: UIScene.ConnectionOptions) -> UISceneConfiguration {
  return UISceneConfiguration(name: "Default Configuration", sessionRole: connectingSceneSession.role)
}
Step 3:
-
Create a new file which is
UIRespondersubclass calledSceneDelegateand let it conform to theUIWindowSceneDelegateand add a window property. -
If you’re using storyboard then UIKit will automatically setup a window with your storyboards initial view controller.
-
If you want to set up viewcontroller in code then implement
scene(_:willConnectTo:options:)inSceneDelegate.swiftfile and add viewcontroller as window rootViewcontroller. This function look like this.
func scene(_ scene: UIScene, willConnectTo session: UISceneSession, options connectionOptions: UIScene.ConnectionOptions) {
  guard let windowScene = scene as? UIWindowScene else { return }
  let window = UIWindow(windowScene: windowScene)
  // Provide your apps root view controller
  window.rootViewController = rootViewController()
  self.window = window
  window.makeKeyAndVisible()
}
Things to remember:
1/ black screen appears when we run app without any view loaded into UIWindow. Try to achieve this by following steps:
-
Delete the
Main.storyboardfile -
In your
info.plistgo to:
Application Scene Manifest
   |
   --→ Scene Configuration
       |
       --→ Application Session Role
           |
           --→ Storyboard Name
-
Delete that
Storyboard Namekey-value pair. -
Don’t create and add view programatically to the
UIWindowinscenedelegatefile. -
run the app and you should see a black screen — this is because Your
SceneDelegatecontains a nullUIWindow.
2/ We always need to configure our UIWindow to hold a reference to our UIWindowScene this is accomplished via the UIWindowSceneDelegate
3/ Your class that conforms to UIWindowSceneDelegate is the new AppDelegate and it holds a reference to your UIWindow
4/ [Scene] Calling -[UIApplication requestSceneSessionActivation:] requires multiwindow adoption. — this causes when you’re trying to open a new window using instance of NSUserActivity.
- It can be fixed by setting
UIApplicationSupportsMultipleSceneskey withinUIApplicationSceneManifestdictionary toYESin yourInfo.plist

5/ Use same name for Configuration Name in Info.plist and func application(_:configurationForConnecting:options:) -> UISceneConfiguration in appdelegate. similarly use same name for storyboard as well.
6/ keep uniq identifier for NSUserActivity, Configuration Name and Delegate class name
Conclusion
The main reason for Apple to add UISceneDelegate to iOS 13 was to create a good entry point for multi-windowed applications. AppDelegate is responsible for handling application-level events, like app launch and the SceneDelegate is responsible for scene lifecycle events like scene creation, destruction and state restoration of a UISceneSession.
I hope, above tutorial will help to clear the concepts of scene delegate.
Reference: https://manasaprema04.medium.com/scene-delegate-vs-appdelegate-86e22dc17fcb