on
Managing different Environments using XCode Build Schemes and Configurations
It’s best practice to have separate environments for your iOS apps, especially if they are communicating with any servers. For instance, consider an iOS app and three different available web backend environments: development, staging, and production.
What’s the best way to switch in the iOS app to use these different servers? What about all the other potential key/value pairs of information, like API keys – and what if some of that information needs to be secure and not checked into version control?
The simplest way is to create a file to store these environment variables as a string or other constants in the native language, like Swift. However, this may lead to numerous issues - whether it be for security reasons or overall bad practices involving hardcoding flag values or relying on macros. Instead, let’s use separate files that we can avoid checking into version control that explicitly outline the properties of the app that will change on an environmental basis.
In this article I covered the following things:
-
What is Workspace, Project , Target, Scheme, Build Settings, Configurations, Build Phases
-
How to manage different environment (QA. DEV , PROD) Using Multiple Configurations and Schemes
-
How to Setup third-party entries in Single Info.plist for All environment
-
How to Manage Different Server Url for Different Environment Using UDS(User Defined Setting)
-
How to Manage Different Server Url for Different Environment Using Xcode Configuration File
-
How to incorporate FireBase GoogleService-Info In Multiple Configuration By Injecting File through Code
-
How to incorporate FireBase GoogleService-Info In Multiple Configuration Using Run Script
-
Should we use multiple targets for managing Different Environment?
Workspace
A workspace is an Xcode document that groups projects
-
A workspace can contain any number of Xcode projects
-
File in one Xcode project can be visible to Other project within a same workspace because By default, all the Xcode projects in a workspace are built in the same directory, referred to as the workspace build directory
-
One Xcode project can be used by multiple workspace because each project in a workspace continues to have its own independent identity.
Xcode Project
An Xcode project is a repository for all the files, resources, and information required to build one or more software products
-
It contains one or more targets, which specify how to build products. (Extension , Unit and UITest)
-
A project defines default build settings for all the targets in the project (each target can also specify its own build settings, which override the project build settings).
-
You can specify more than one build configuration ((DEBUG, RELEASE)) for a project
As shown in Figure 1 we have a project build setting and a Target build setting. If we don’t override it then it will used the project setting . (Inheritance like)

Figure 1
Xcode Target
A target specifies a product to build and contains the instructions for building the product from a set of files in a project or workspace
Target is a combination of inputs usually source files and resources and then instruction how to build them and what to build them. A testing target can add bunch of tests that you can run and project contains one or more target . They can depend on other target . UI and unit test depend on your app target so when you run your unit test it has to build your app .
-
Each target defines a list of build settings for that project
-
Each target also defines a list of classes, resources, custom scripts etc to include/ use when building.
Xcode Scheme
An Xcode project is a repository for all the files, resources, and information required to build one or more software products
-
You can have as many schemes as you want, but only one can be active at a time.
-
Schemes define configuration to use when building, and a collection of tests to execute.
-
One target should have at least one scheme
As shown in Figure 2 I created two schemes MultipleEnvironmentWithAddressSanitizer(enable address sanitizer) and the one created by default MultipleEnvironment (disable address sanitizer)
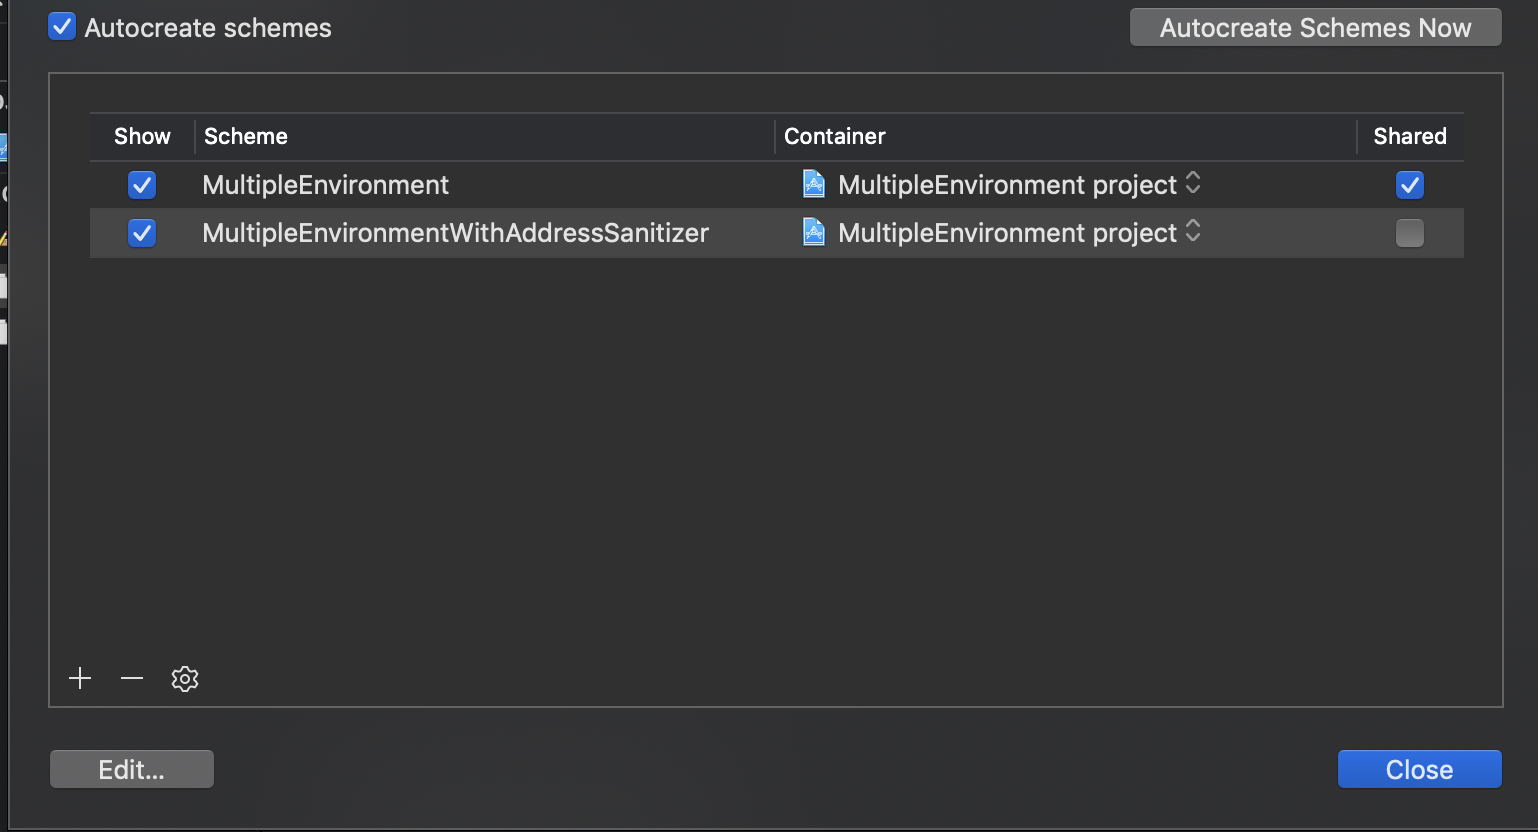
Figure 2
Build Settings
Build setting are options for the build phases basically they are just bunch of variables when building a target
Configurations
Just a set of build settings so if you have a target which has build setting you can have a configuration which is another set of build settings usually way you get from xcode template debug and release configurations so you will notice that your app kind of gets build differently if you are debugging it from xcode vs archiving release
Build Phases
Another part of target is build phases each target has a set of build phases , there are some built in ones like the compile the code plus you can create
You can create run script that can be a bash script, perl script , ruby script pretty much everything and do whatever you want that will be included as part of the build process. If you are familiar with makefile is kind of like that , if you want to run swiftlint maybe as part of your build process or a code formatter do some other stuff that maybe Xcode does not give out of the box, All build setting are available as environment variable within the script
Managing Different environment Using Multiple Configurations and Schemes
Configurations
In Xcode, a project can have multiple configurations. By default, a new Xcode project will have two configurations: Debug and Release. Sometimes, these two configurations may suffice. However, that’s usually not my experience. For this walkthrough, we’ll define three environments, Development, Staging and Production. Each of these will have a corresponding configuration, debug and release. Let’s create these now.
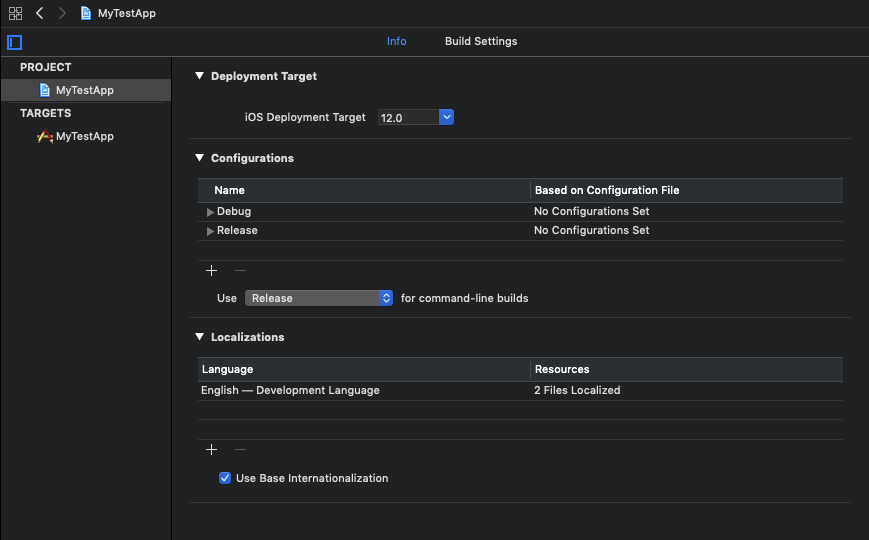
In the Navigator Area, select the project file (the top-most file). Then, from within the Editor Area, make sure the project is selected as well as the Info tab. Take a look at the Configurations section.
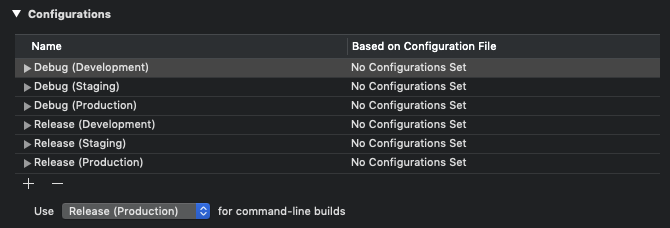
Creating a new configuration is straightforward. Since we’ll have three environments, each with a Debug and Release configuration, we’ll create the following:
- Debug (Development)
- Debug (Staging)
- Debug (Production)
- Release (Development)
- Release (Staging)
- Release (Production)
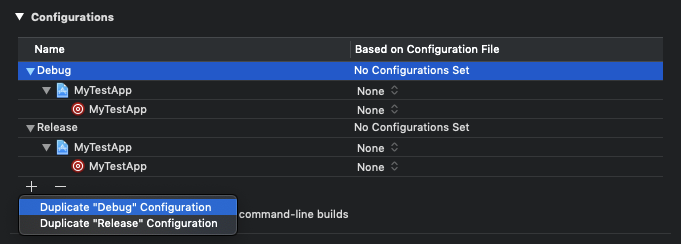
Select the + icon at the bottom of the Configurations section and Duplicate “Debug” Configuration
Repeat this and rename the existing Configurations until you have the following:
Schemes
Xcode projects also come with one scheme by default that’s named after the project. An Xcode scheme defines a collection of configurations to use when building, as well as tests to execute and a collection of targets to build. Schemes are accessible via the scheme selector in the toolbar. For this project, we’ll have one scheme per environment. Let’s create the other two now.
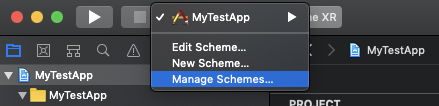
From the Xcode toolbar, head to the Scheme selector. Open the Scheme pop-up menu and select Manage Schemes…
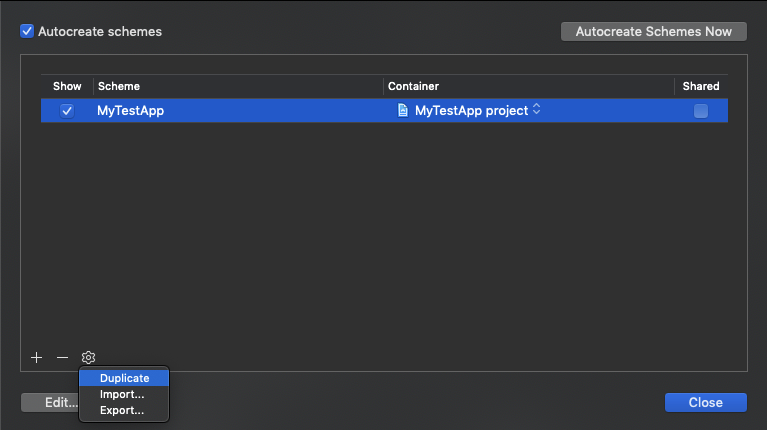
In the Scheme manager we see a list of schemes available in the project, what container they are in and whether or not they are shared. Click the current scheme, and at the bottom, click the cog to open the settings pop-up. Select Duplicate
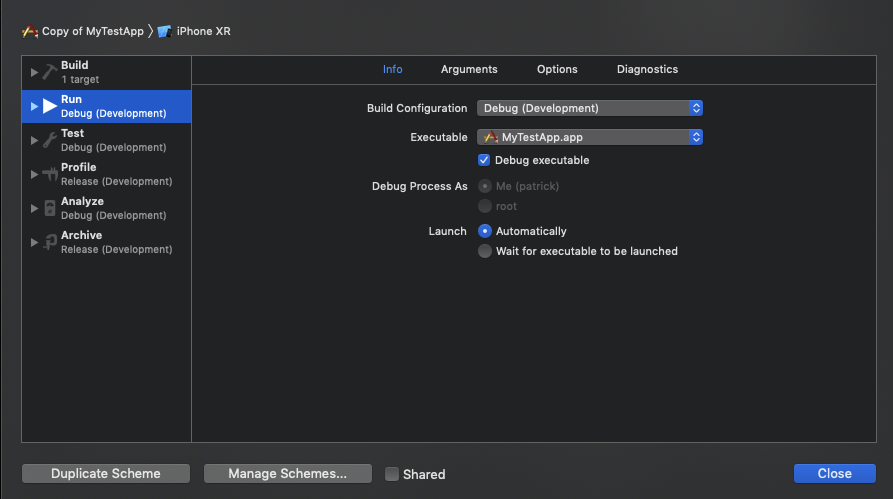
This scheme we’re creating will be the Development scheme. Ensure that the appropriate configuration is set for each action like so:
Create another scheme for Staging and ensure the correct configurations are set as well. Finally, verify that the default scheme is using Production configurations, and make sure all are marked as Shared so that they are not strictly local to only your own Xcode environment, but available project-wide. If this is not checked, others opening this project cannot utilize these schemes! You should have something like this when done:

Creating xcconfig files
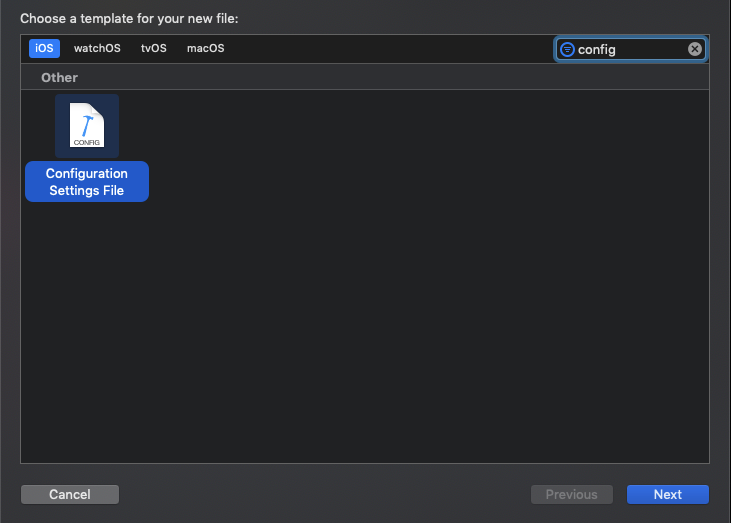
Now that a simple project structure is set up, let’s create the xcconfig files our Configurations will be using. Within the Config folder, add a new file and select the Configuration Settings File.
Name the file Development, and ensure that no Target is selected - you don’t want these in the application bundle as they are not being compiled.
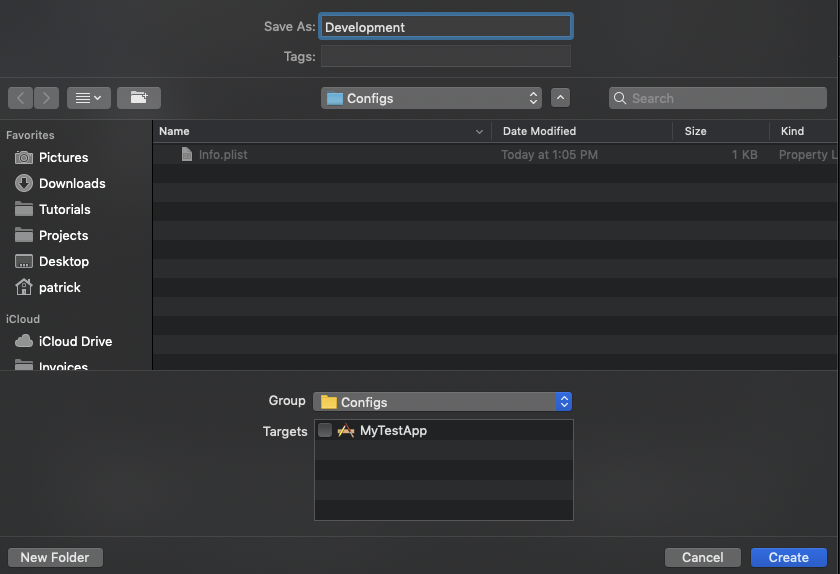
Repeat the above steps for Staging and Production.
Now, let’s actually enter configuration variables.
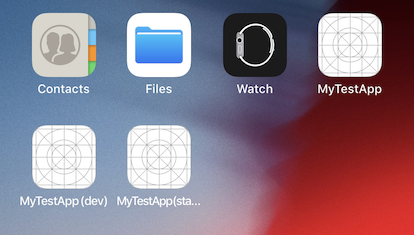
These files are used to store key-value pairs of settings. Our keys will be xcconfig variables. Variables are assigned in xcconfig files using the = operator after a variable name, such as MY_FLAG = bar (whitespace will be ignored on either side of the equals sign). In our example, each environment will have a different ROOT_URL, API_KEY , APP_NAME and BUNDLE_IDENTIFIER. Having different app names and bundle identifiers lets us have a different copy of the app on a device or simulator for each environment…all at the same time!
Here’s what Development.xcconfig looks like:
// Development.xcconfig
// Server URL
ROOT_URL = http:/$()/localhost:3000

// Keys
API_KEY = 783u9djd8a_hkzos7jd803001nd

// App Settings
APP_NAME = MyTestApp (dev)
APP_BUNDLE_ID = com.thoughtbot.MyTestApp.dev
Repeat the above for Staging and Production environments, changing the settings as follows:
// Staging.xcconfig
// Server URL
ROOT_URL = https:/$()/www.staging.mytestapp.thoughtbot.com

// Keys
API_KEY = 89dhdyd93380dkqmoe_hd830dhq

// App Settings
APP_NAME = MyTestApp (staging)
APP_BUNDLE_ID = com.thoughtbot.MyTestApp.staging
// Production.xcconfig
// Server URL
ROOT_URL = https:/$()/www.mytestapp.thoughtbot.com

// Keys
API_KEY = 9ud0930djd_md9zdjdko3830lb0d

// App Settings
APP_NAME = MyTestApp
APP_BUNDLE_ID = com.thoughtbot.MyTestApp
Note: You may have noticed some strangeness with the ROOT_URL formatting. This is due to the way characters are escaped in xcconfig files. In order to have the // in https://, we need to split it with an empty variable substitution via $(). A minor annoyance, but simple when you know to do it.
Setting xcconfig files for Configurations
Now that we have our xcconfig files set up, we need to set the appropriate file for each Configuration we created previously.
Head back to the Project Info tab in the Editor view. Click the disclosure indicator for a given Configuration, and notice that the target has no configuration set. From the dropdown on the right, select the appropriate configuration file. Repeat until all the Configurations are set as follows:

CocoaPods note for existing projects: If you’re using CocoaPods with an existing project and want to follow along, you’ll have to do a tiny bit of extra work to have it set up as CocoaPods has it’s own xcconfig files.
- Delete the
.xcworkspacefile - Delete the
Podfile.lockfile andPods/directory - Keep the
Podfile - Rerun
pod install
You’ll see in Terminal that CocoaPods did not set the configuration since we already set custom configurations. CocoaPods provides a link to be included in each
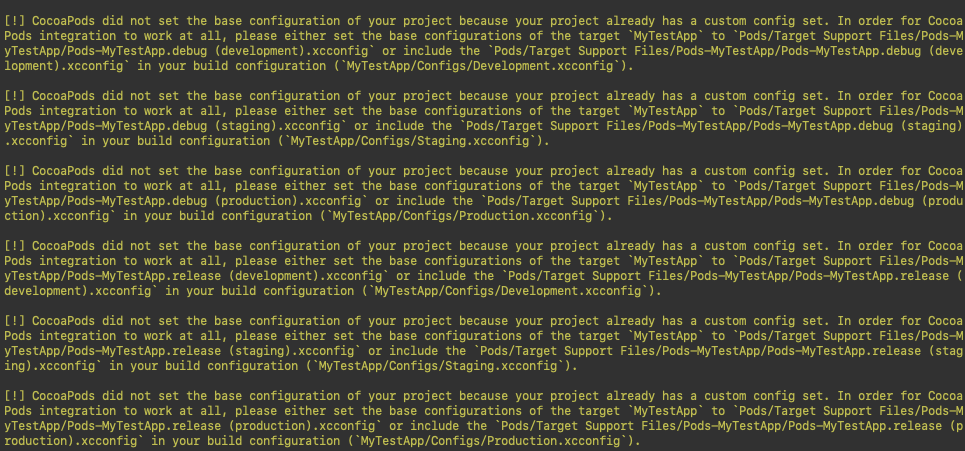
- Open new
.xcworkspace - Include .xcconfig path for CocoaPods in your .xcconfig files by prepending an
#includestatement like the following:#include “Pods/Target Support Files/Pods-MyTestApp/Pods-MyTestApp.release.xcconfig”
Accessing configuration values from project settings
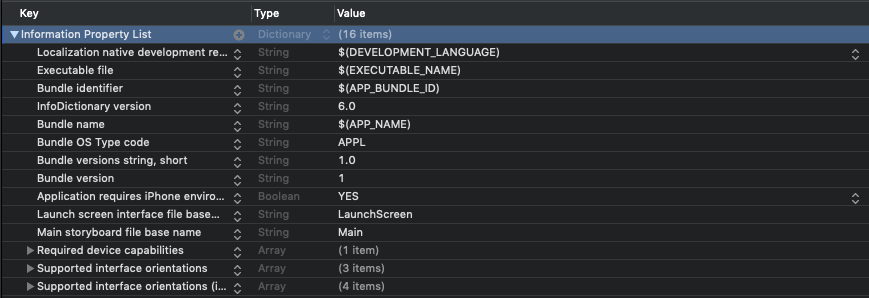
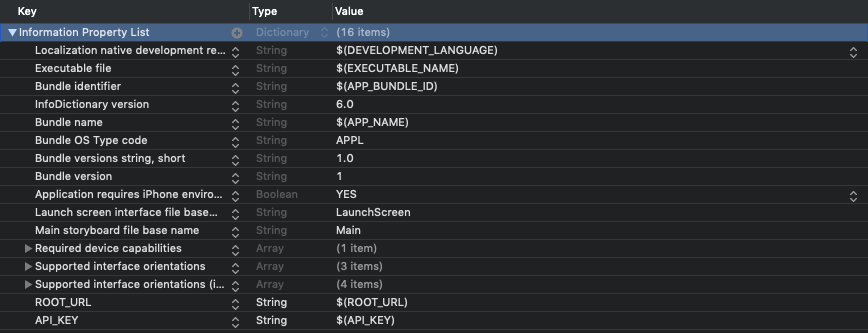
To actually use our new configuration settings for our project, let’s begin with editing the Info.plist.
Recall that we intend each environment to have a different APP_NAME and APP_BUNDLE_ID. We can use variable substitution in the .plist for the appropriate keys, substituting our custom variables from the xcconfig files. Here, we’ve changed Bundle name‘s value to $(APP_NAME) and Bundle Identifier to $(APP_BUNDLE_ID).
With these changes, build and run the app using different schemes from the Scheme selector. The result is three different versions of the app, each using their corresponding environment.
Accessing configuration values from code
While we’ve used variable substitution in our Info.plist file to specify some project settings per-environment, we also need to be able to access some of our config variables from actual code - such as our ROOT_URL and API_KEY. Let’s begin by adding them to our Info.plist.
Since Xcode projects don’t include a ROOT_URL or API_KEY key in the plist by default, we’ll have to add two new entries. To do so, tap the plus button anywhere in the file. Set the Type to String and the value to the substituted value from our xcconfig files like so:
Now that these variables are in our plist, we can access them from Swift. One recommended way of doing so is creating an Environment.swift file. This will contain an enum with no cases to serve as a namespace to access the plist and the variables contained within. We’ll create two static properties, rootURL and apiKey that will return a URL and a String respectively. We’ll initialize them in a closure to contain the logic of retrieving them from the plist, and call fatalError: with the appropriate message.
Note that we’ve explicitly decided to call fatalError: in this case as it signifies a programming error, rather than encountering an expected nil state. We do not intend the xcconfig files or Info.plist to not have these values, and crashing the app while providing this helpful message will give context and allow for correction by the programmer.
Add this file to the Configs folder:
// Environment.swift

import Foundation

public enum Environment {
  private static let infoDictionary: [String: Any] = {
    guard let dict = Bundle.main.infoDictionary else {
      fatalError("Plist file not found")
    }
    return dict
  }()

  static let rootURL: URL = {
    guard let rootURLstring = Environment.infoDictionary["ROOT_URL"] as? String else {
      fatalError("Root URL not set in plist for this environment")
    }
    guard let url = URL(string: rootURLstring) else {
      fatalError("Root URL is invalid")
    }
    return url
  }()

  static let apiKey: String = {
    guard let apiKey = Environment.infoDictionary["API_KEY"] as? String else {
      fatalError("API Key not set in plist for this environment")
    }
    return apiKey
  }()
}
Now we’re capable of accessing the rootURL and apiKey throughout our Swift code. But let’s make one more adjustment. It’s often considered a best practice to remove stringly-typed code as much as possible, and we have potential to do so when accessing the values within our infoDictionary. Let’s create an enum that will contain these plist keys and add it to our Environment.swift file:
// Environment.swift

import Foundation

public enum Environment {
  // MARK: - Keys
  enum Keys {
    enum Plist {
      static let rootURL = "ROOT_URL"
      static let apiKey = "API_KEY"
    }
  }

  // MARK: - Plist
  private static let infoDictionary: [String: Any] = {
    guard let dict = Bundle.main.infoDictionary else {
      fatalError("Plist file not found")
    }
    return dict
  }()

  // MARK: - Plist values
  static let rootURL: URL = {
    guard let rootURLstring = Environment.infoDictionary[Keys.Plist.rootURL] as? String else {
      fatalError("Root URL not set in plist for this environment")
    }
    guard let url = URL(string: rootURLstring) else {
      fatalError("Root URL is invalid")
    }
    return url
  }()

  static let apiKey: String = {
    guard let apiKey = Environment.infoDictionary[Keys.Plist.apiKey] as? String else {
      fatalError("API Key not set in plist for this environment")
    }
    return apiKey
  }()
}
We’re now able to access entries of the infoDictionary using our Keys.Plist enum’s static properties. While it may not appear as a large change on the surface, it helps to have a single point of configuration and eliminate potential confusion. It’s apparently obvious to the programmer reading this file that we’re intentionally accessing the rootURL of the infoDictionary as we’ve explicitly added a property to do so.
Now that we’ve created a structured way to access these values, let’s test it out!
In the stock ViewController.swift file, add the following line to viewDidLoad to print the API_KEY and ``ROOT_URL`:
class ViewController: UIViewController {

  override func viewDidLoad() {
    super.viewDidLoad()

    print(Environment.apiKey)
    print(Environment.rootURL.absoluteString)
  }
}
Select a scheme, build and run and observe the console output!

Security Considerations
Since these files will potentially contain secure information, such as API_KEY, I’d recommend not checking them into version control and instead using a secure file storage system like 1Password to contain copies of Development.xcconfig, Staging.xcconfig and Production.xcconfig.
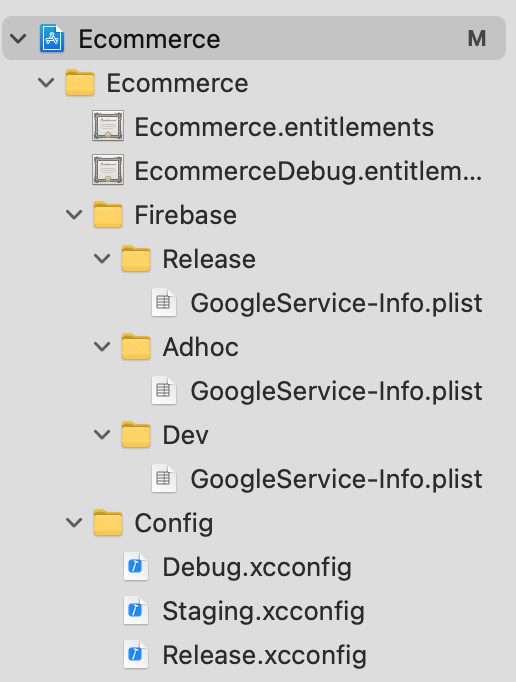
FireBase GoogleService-Info In Multiple Configuration
For each configurations we put the file in folder
we created a run script that is doing the following things
-
Get the value from
APPLICATION_NAMEwe configured in Using Xcode Configuration File (.xcconfig) section -
Copy Google service file to main Project with the name
GoogleService-Info.plistthat is required by the Firebase
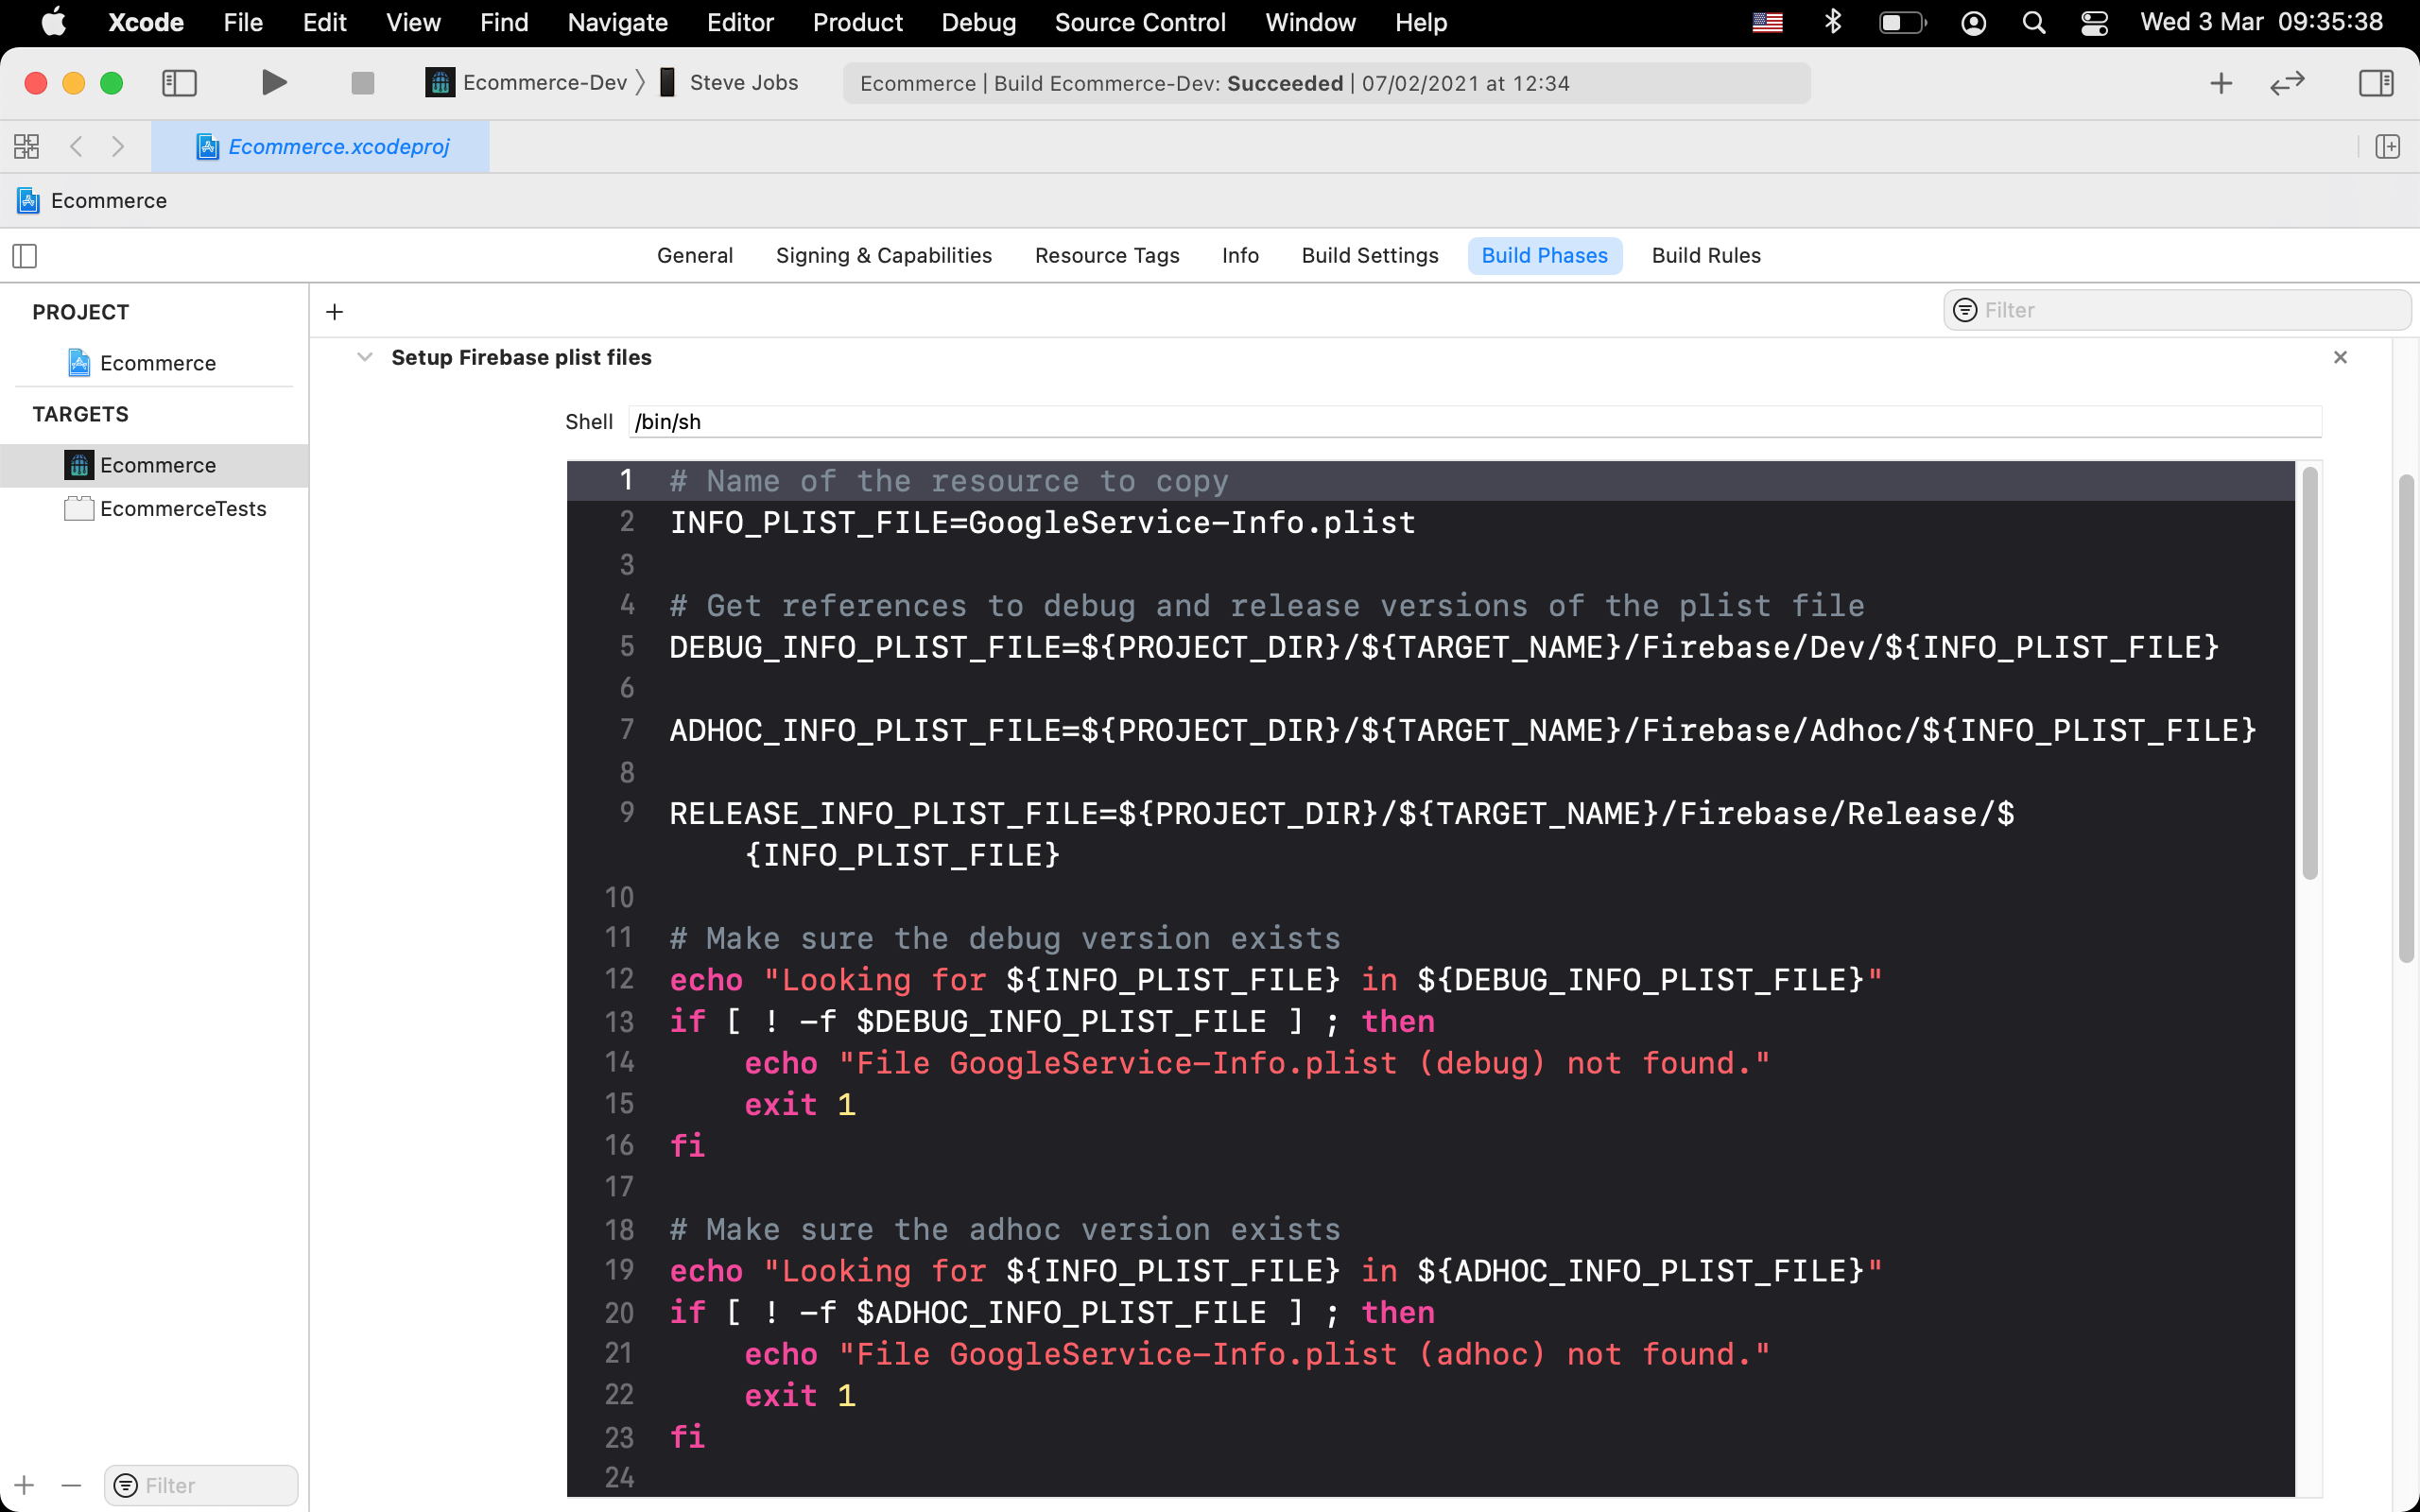
Complete script code:
# Name of the resource to copy
INFO_PLIST_FILE=GoogleService-Info.plist

# Get references to debug and release versions of the plist file
DEBUG_INFO_PLIST_FILE=${PROJECT_DIR}/${TARGET_NAME}/Firebase/Dev/${INFO_PLIST_FILE}

ADHOC_INFO_PLIST_FILE=${PROJECT_DIR}/${TARGET_NAME}/Firebase/Adhoc/${INFO_PLIST_FILE}

RELEASE_INFO_PLIST_FILE=${PROJECT_DIR}/${TARGET_NAME}/Firebase/Release/${INFO_PLIST_FILE}

# Make sure the debug version exists
echo "Looking for ${INFO_PLIST_FILE} in ${DEBUG_INFO_PLIST_FILE}"
if [ ! -f $DEBUG_INFO_PLIST_FILE ] ; then
    echo "File GoogleService-Info.plist (debug) not found."
    exit 1
fi

# Make sure the adhoc version exists
echo "Looking for ${INFO_PLIST_FILE} in ${ADHOC_INFO_PLIST_FILE}"
if [ ! -f $ADHOC_INFO_PLIST_FILE ] ; then
    echo "File GoogleService-Info.plist (adhoc) not found."
    exit 1
fi

# Make sure the release version exists
echo "Looking for ${INFO_PLIST_FILE} in ${RELEASE_INFO_PLIST_FILE}"
if [ ! -f $RELEASE_INFO_PLIST_FILE ] ; then
    echo "File GoogleService-Info.plist (release) not found."
    exit 1
fi

# Get a reference to the destination location for the plist file
PLIST_DESTINATION=${BUILT_PRODUCTS_DIR}/${PRODUCT_NAME}.app
echo "Copying ${INFO_PLIST_FILE} to final destination: ${PLIST_DESTINATION}"

if [ "${CONFIGURATION}" == "Debug" ]; then
    echo "File ${DEBUG_INFO_PLIST_FILE} copied"
    cp "${DEBUG_INFO_PLIST_FILE}" "${PLIST_DESTINATION}"
elif [ "${CONFIGURATION}" == "Staging" ]; then
    echo "File ${ADHOC_INFO_PLIST_FILE} copied"
    cp "${ADHOC_INFO_PLIST_FILE}" "${PLIST_DESTINATION}"
elif [ "${CONFIGURATION}" == "Release" ]; then
    echo "File ${RELEASE_INFO_PLIST_FILE} copied"
    cp "${RELEASE_INFO_PLIST_FILE}" "${PLIST_DESTINATION}"
else
    echo "NOTHING"
fi
Should we use multiple targets for managing Different Environment?
The best practice is to use single target with multiple schemes and configuration and the reasons are
-
You need maintain only one plist file as compared to multiple targets
-
While adding a new file you need to ensure to select all targets to keep your code synced in all configurations.
-
Extra targets will be maintained in podfile
Conclusion
Using Xcode configuration files is an elegant and powerful solution for configuring different build settings. While we’ve covered a considerable amount of project tweaking here to get our environments set up the way we want them to be, it’s largely formulaic after you’ve grown comfortable doing so. Feel free to take the template we’ve worked on here and customize it to fit your project’s needs! It’s always worthwhile spending a bit more time configuring things just once than to constantly have to revisit and fix things in the future. 🚀